NOTICE: Certain links on this post may earn a commission for Western Hunter Magazine from Amazon or our other affiliate partners when you make a purchase. Thank you for your support.
Tripod Shooting 101
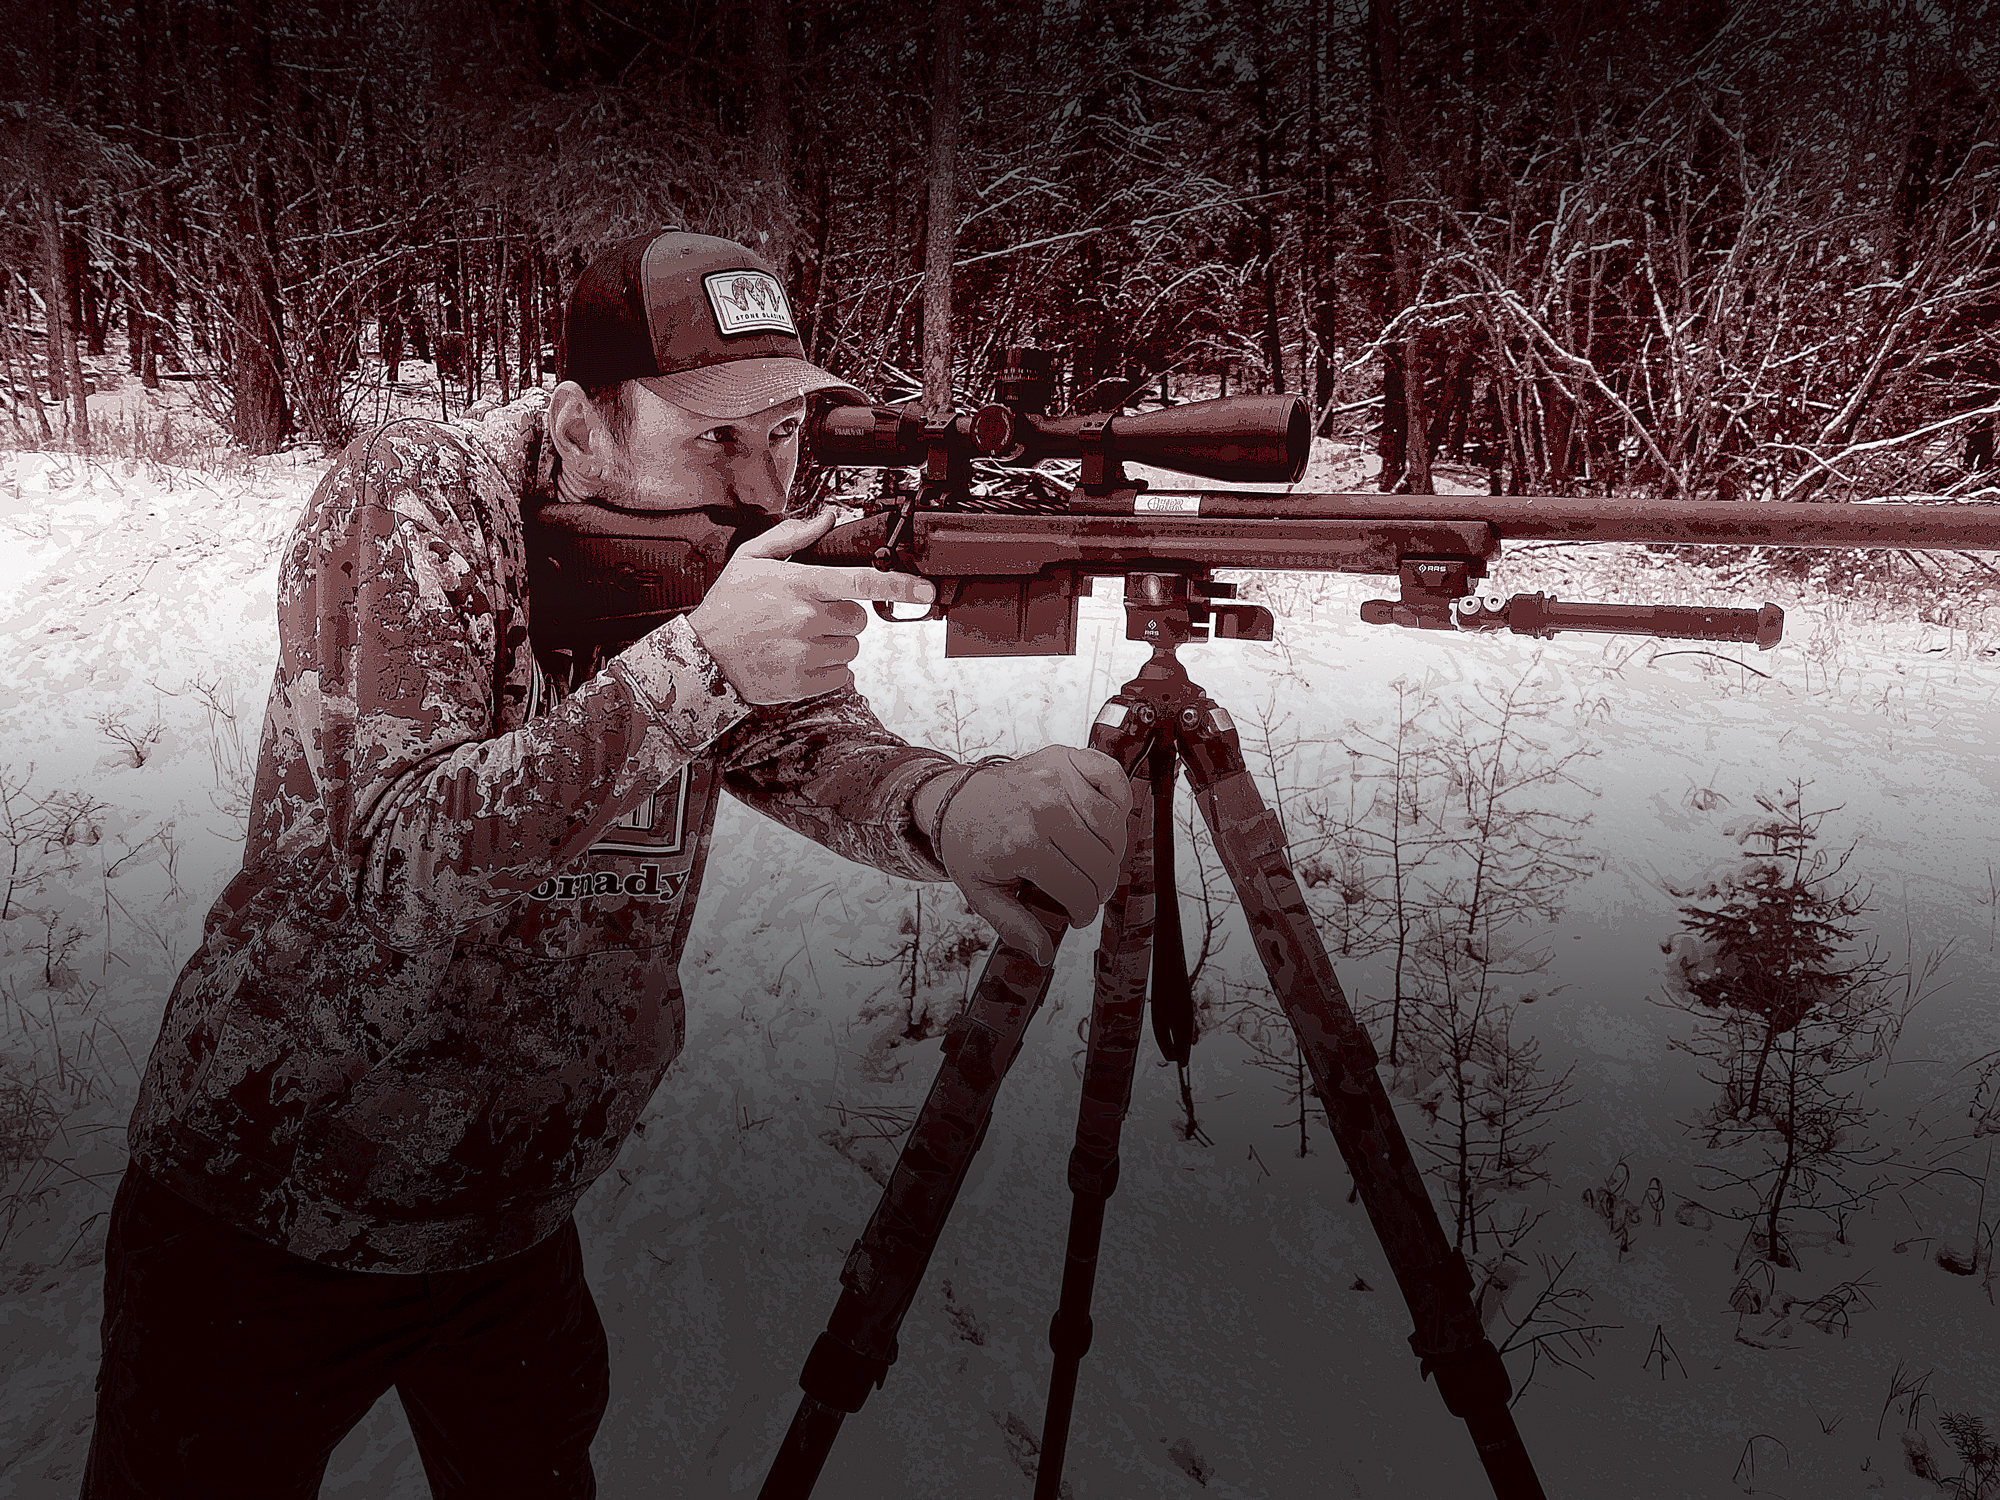
When it comes to hunting the West, the first skill set a hunter should master is the art of glassing from a tripod. Second, he should master utilizing the tripod as a shooting support. A proper tripod should be able to offer the hunter a wide variety of shooting positions in the field to increase their odds of success. So many times I have seen hunters glass off a tripod and locate their quarry, then struggle to find a prone shooting position on the side of a hill and miss out on an opportunity. It should be this simple: Remove your glass from the tripod, clip your rifle into a tripod head or rifle rest, adjust leg length accordingly, range, and shoot. With the proper rifle setup, tripod, and some practice in the off-season, you should be able to transition from glassing to shooting in seconds and increase your odds of success this fall.
When selecting a tripod for hunting purposes, there are a few key things to consider before buying. First, the tripod should have three adjustable leg sections to fit the user from standing to seated positions. These leg sections should be twist or lever-locked, open and close silently, and lock securely with zero slipping. Second, the legs should be able to change their angle from the trunnion to lay the legs nearly flat for seated shooting with a total of three positions. I consider these adjustments from standing, kneeling, and seated to allow the widest and most stable base for each position.

If a tripod has a center post for added adjustment height, you won’t be able to get the legs to lay flat in the other positions without cutting down the center post. I prefer to cut my down to about 4-6” to allow full use of the legs. Keep in mind extending the center post of your tripod out for shooting is a huge sin. Keep the center post down to the lowest position and keep the center of gravity as close to the tripod head as possible. Lastly, the tripod should also have a pan-style head with an Arca-Swiss plate attachment to allow direct attachment of the rifle’s Arca rail to the pan head. This is the quickest, most secure, and easiest way to attach a rifle to a tripod.
Attachment Points
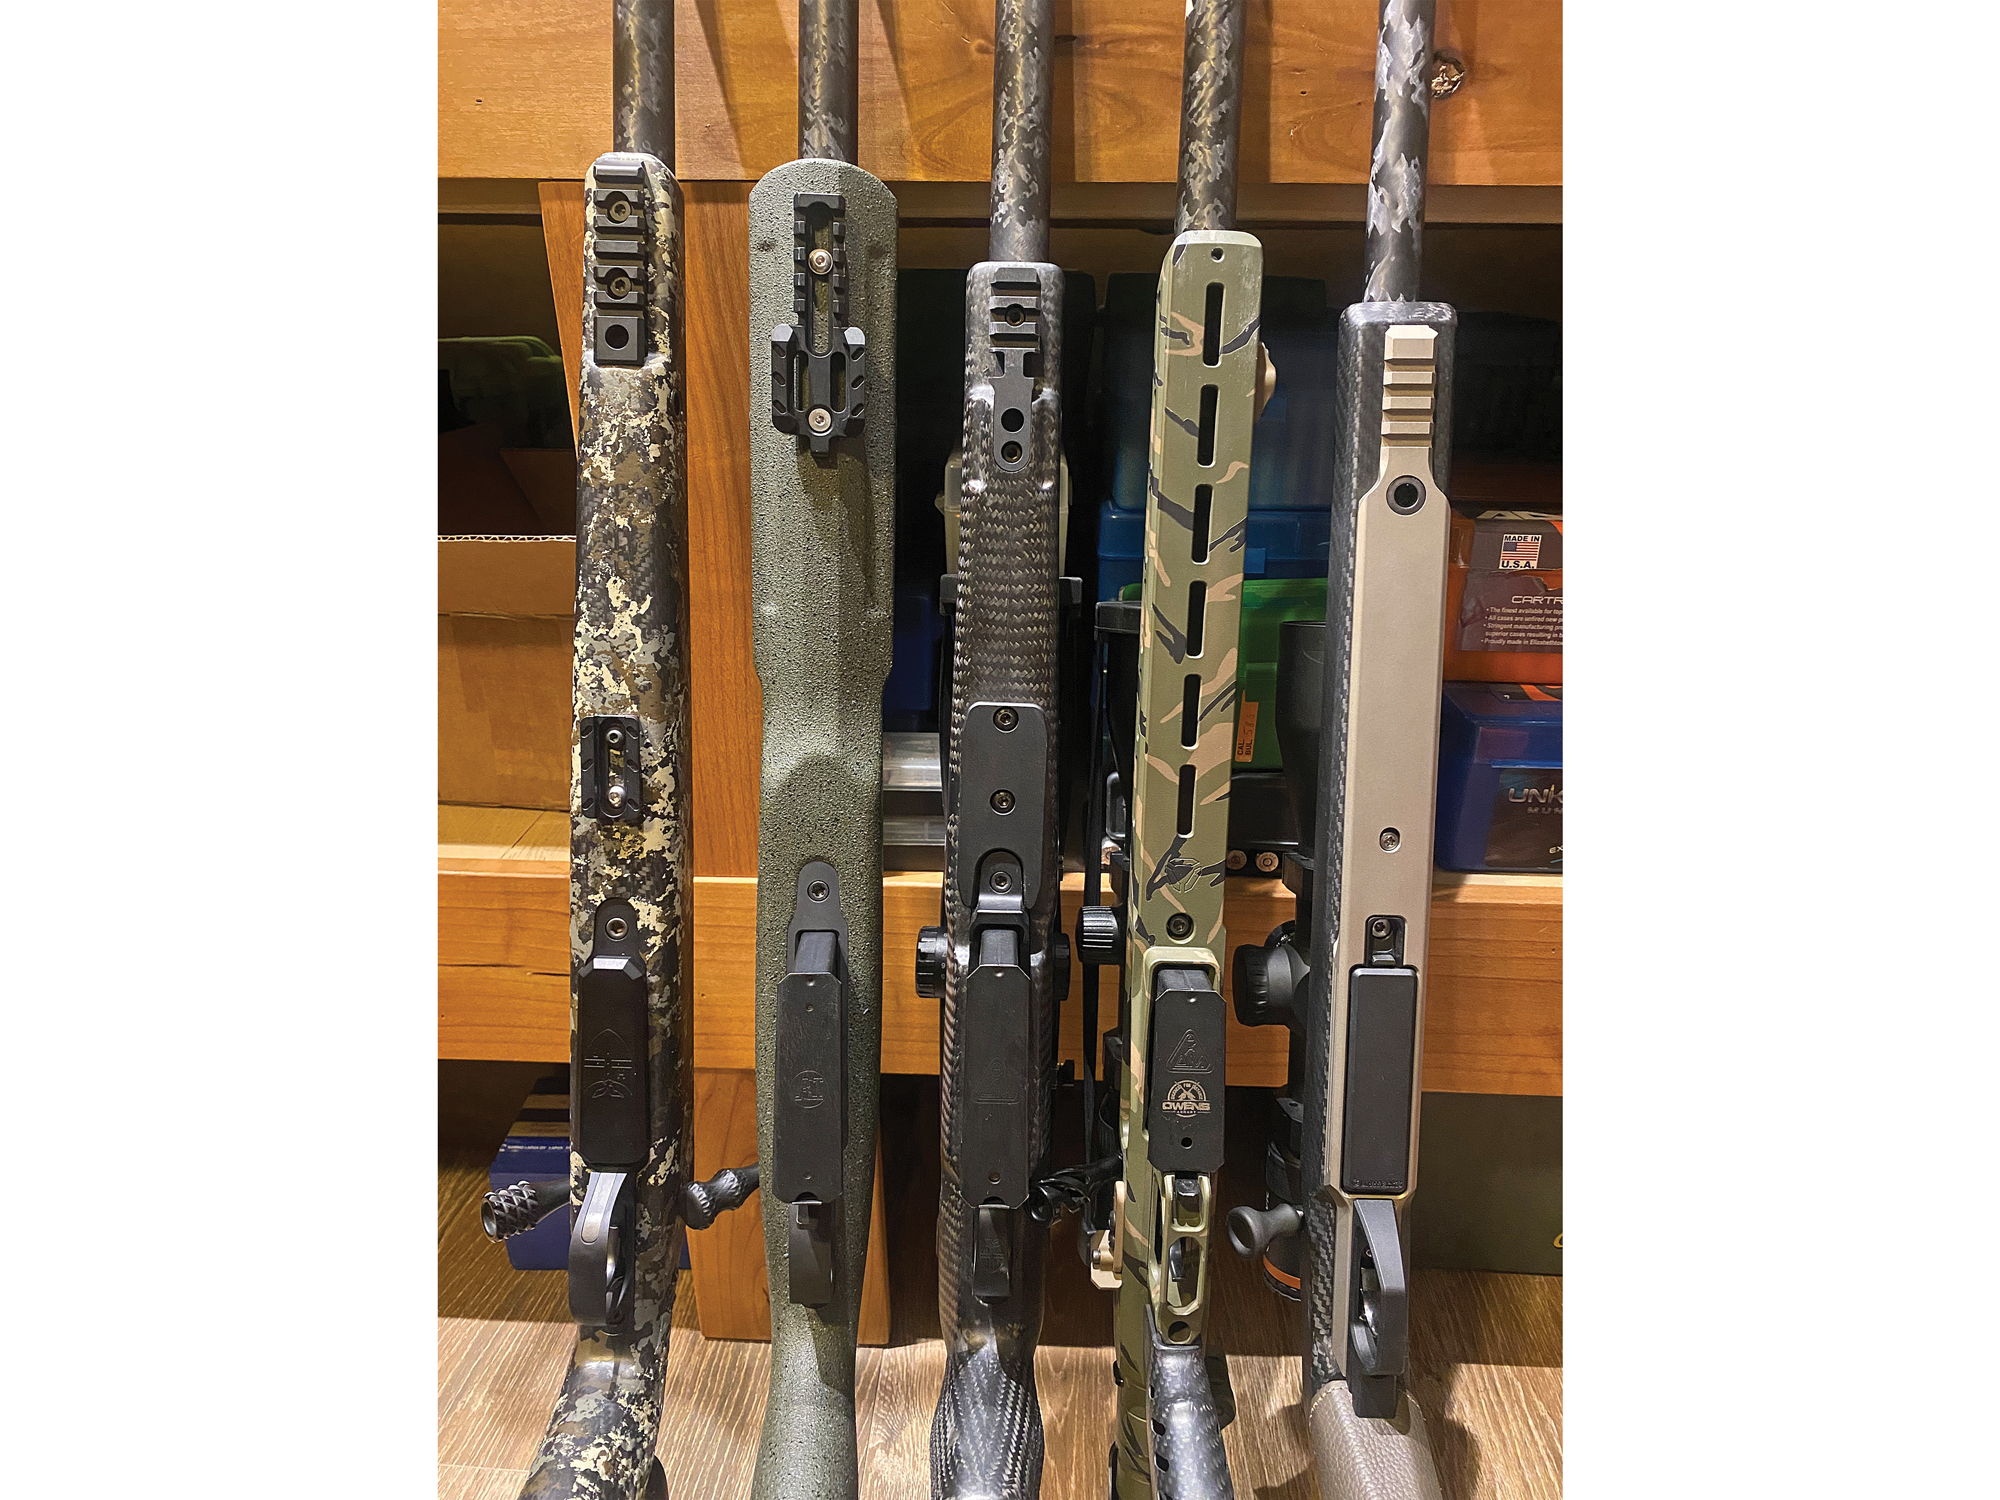
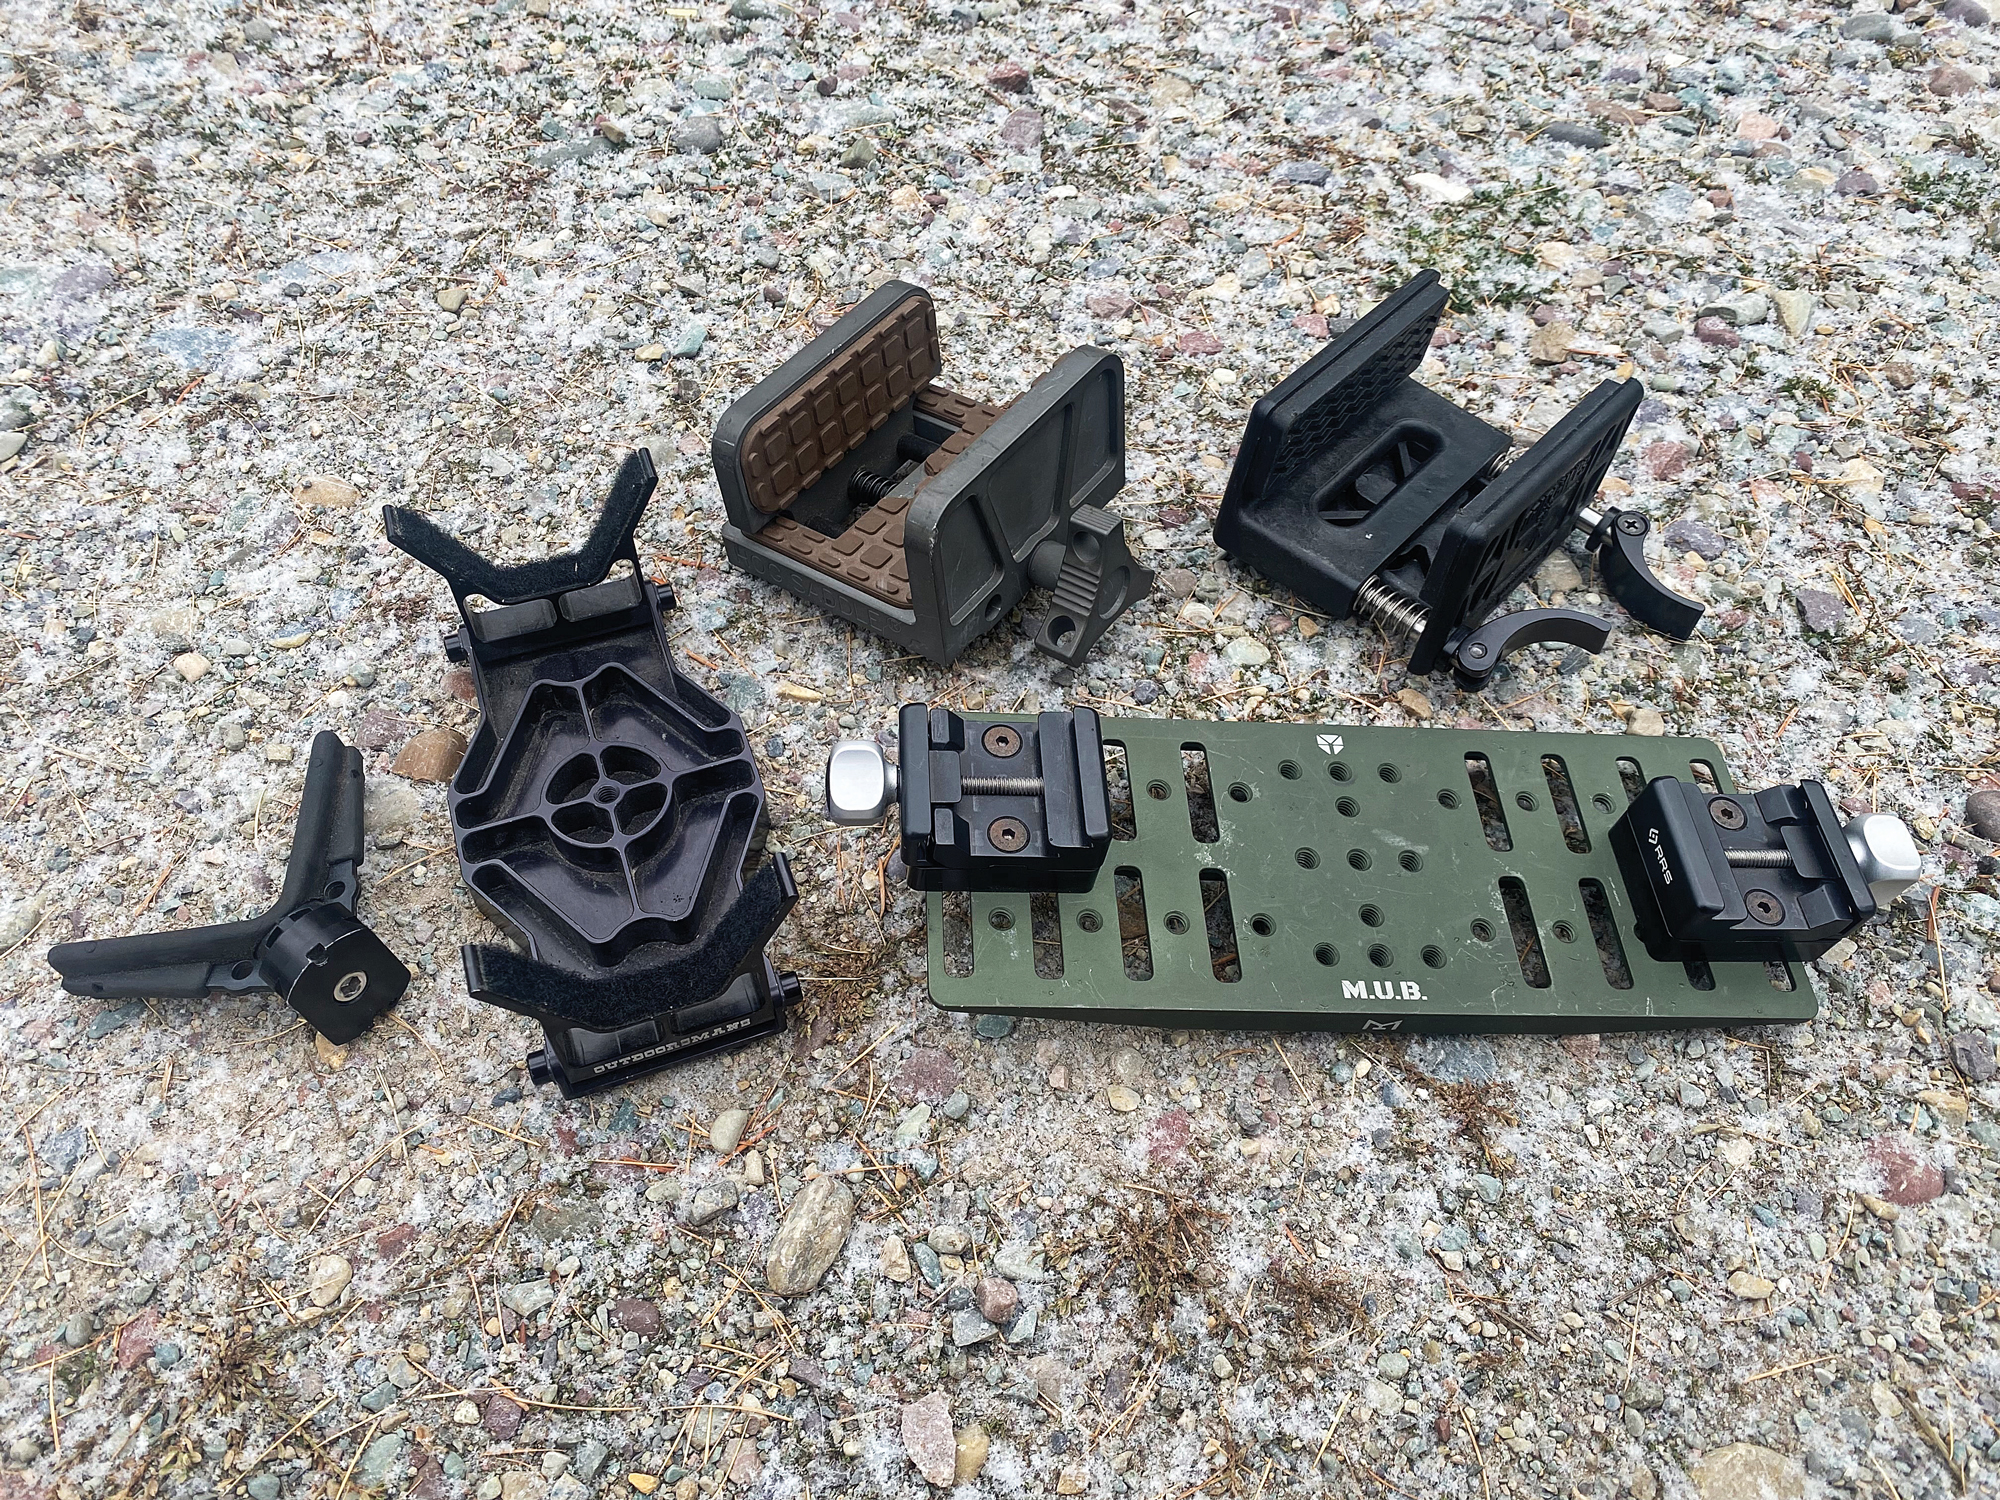
Rifle attachment is the next part of the puzzle. Machined rail sections are available in Arca, Picatinny, and Outdoorsmans dovetail to attach to your rifle’s stock through the front swivel stud holes. These plates offer the ability to attach the rifle for direct clip into your tripod head just like your binoculars and spotting scope. This is by far the best method and should be your primary goal, as it is the fastest and most secure method for tripod rifle shooting. Many new rifles on the market have Arca rails built into their stocks from the factory to allow tripod connection without modifications.
There are rifle rests that clamp to your stock that work great in certain applications where you can’t attach a rail to your rifle stock. This is often the case with a plastic injection molded stock or wood stock. They do not offer the same stability and rock-solid accuracy as directly clipping your rifle to the head of your tripod. If your rifle doesn’t allow for direct clip-in by a rail or you are unwilling to modify your existing rifle, by all means, pick up a rifle rest from Triclawps, Hogg Saddle, or Outdoorsmans that fits your budget and application. The ability to shoot your rifle from a tripod is paramount, so make it happen however you can. With practice, these systems offer ample stability to make some lengthy field shots on game for those willing to put in the work.
Once your rifle and tripod can connect, we can start the training process of building proper shooting positions to fit just about any field shooting opportunity you can think of. Of course, this requires you to omit the shooting bench from your shooting practice to build the skill set properly from the ground up, starting with body position, as always.
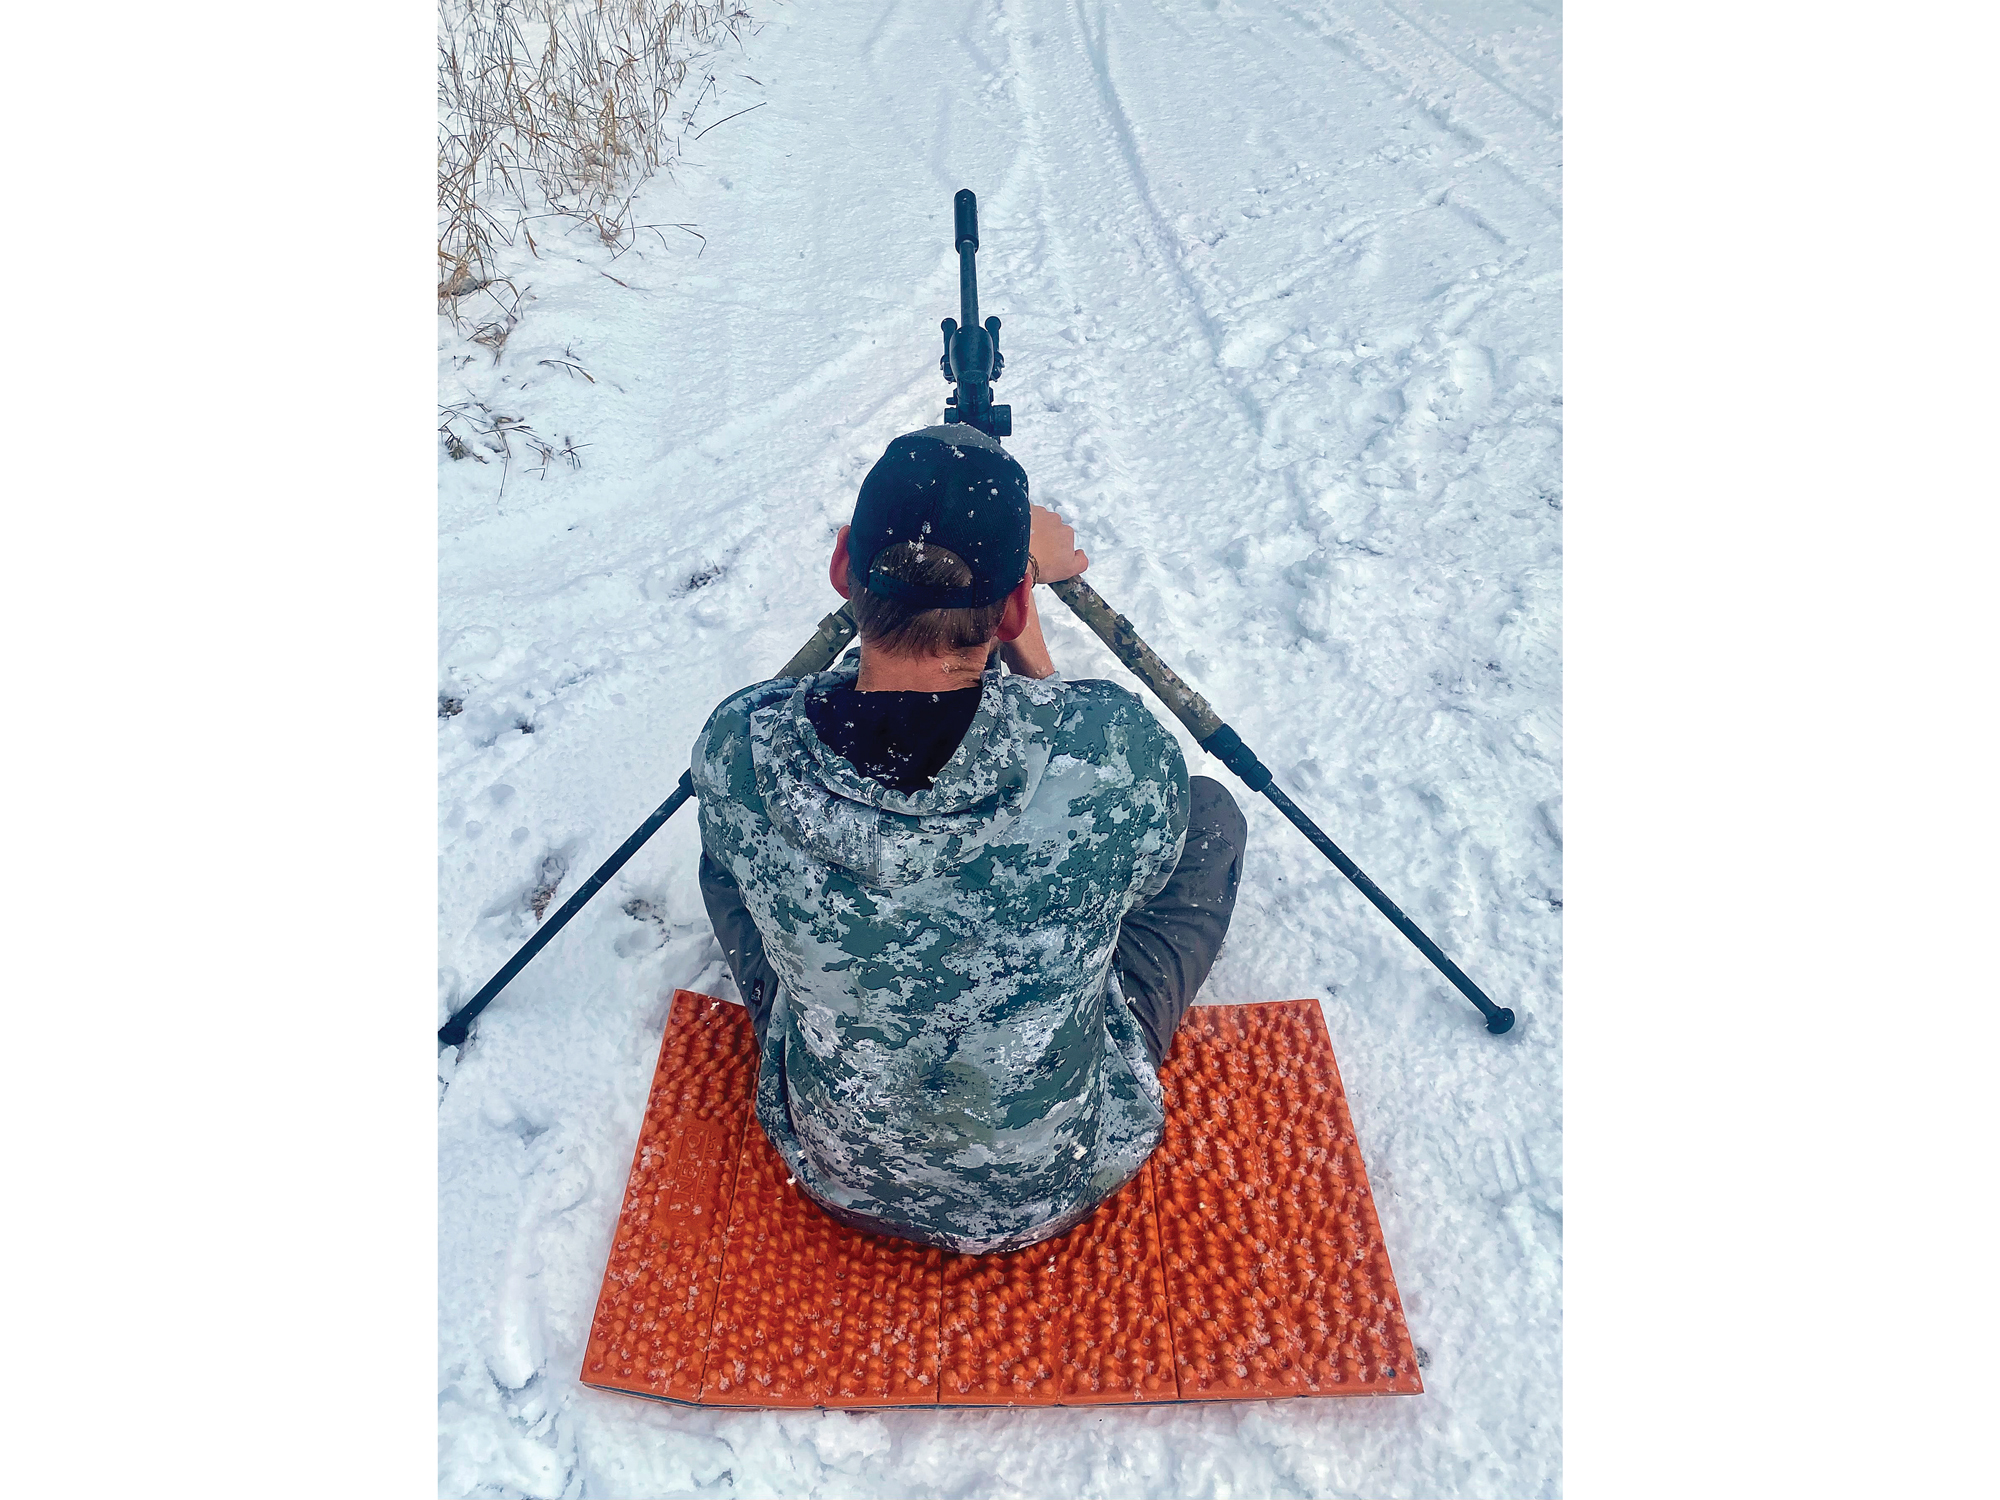
Seated
I start by clipping my rifle onto the tripod with the legs set for sitting in the same position as I would for glassing. I keep the legs open to the middle notch to widen the stance of the legs with the bottom leg extension fully extended. Always start with the lower legs extended first so you can use the upper and middle leg sections to adjust height easily without having to reach down and lift the tripod up to adjust the lower leg.
Once the legs are set for your usual seated glassing position and the rifle is clipped in, ensure the rifle is at the proper height for you to comfortably see through the optic and have a normal cheek weld with the rifle shouldered atop your pectoral muscle and across your collar bone, not out in the shoulder pocket. Shouldering the rifle closer to the centerline of your chest will allow much better recoil management as opposed to blading your body off sideways. If you need to make adjustments to height, do so now and work a system out so you can make adjustments quickly and smoothly without obtrusive movements and noise.
With the tripod and rifle set up properly, we need to build our body position around the rifle and tripod while it is pointed on target to minimize torque and external influences on the rifle and tripod. You want to avoid flexing the stock or lifting a tripod leg off the ground in order to get on target. This is where guys get into trouble, moving the rifle and tripod around them and fighting the process. Move your body to make mass adjustments and then adjust the tripod to make micro and macro adjustments to get a natural point of aim behind the rifle. NPA or Natural Point of Aim is the rifle’s ability to rest with the crosshairs on target without input from the shooter. Building a position around a tripod-mounted rifle with a solid NPA makes life much easier.
When we build our body position behind the rifle properly, we also have a squared stance to the rifle’s recoil pad to increase our ability to manage recoil and stay on target for spotting our impacts and prepping for follow-up shots. Clipping the rifle directly to the tripod head instead of a rifle-clamping rest will limit the rifle’s ability to move independently from the tripod.
A rifle not clamped tightly will move with recoil, forcing you to make adjustments to the rifle and tripod by force with flex and torque in the rifle at its attachment point which can cause it to shift of impact in certain rifle setups. A rifle clipped directly to the tripod and supported properly by the shooter will move slightly but stay on target for rapid follow-up shots and impact spotting with minimal adjustment. The seated position is the most stable and comfortable to shoot from, so we start here and work our way up.
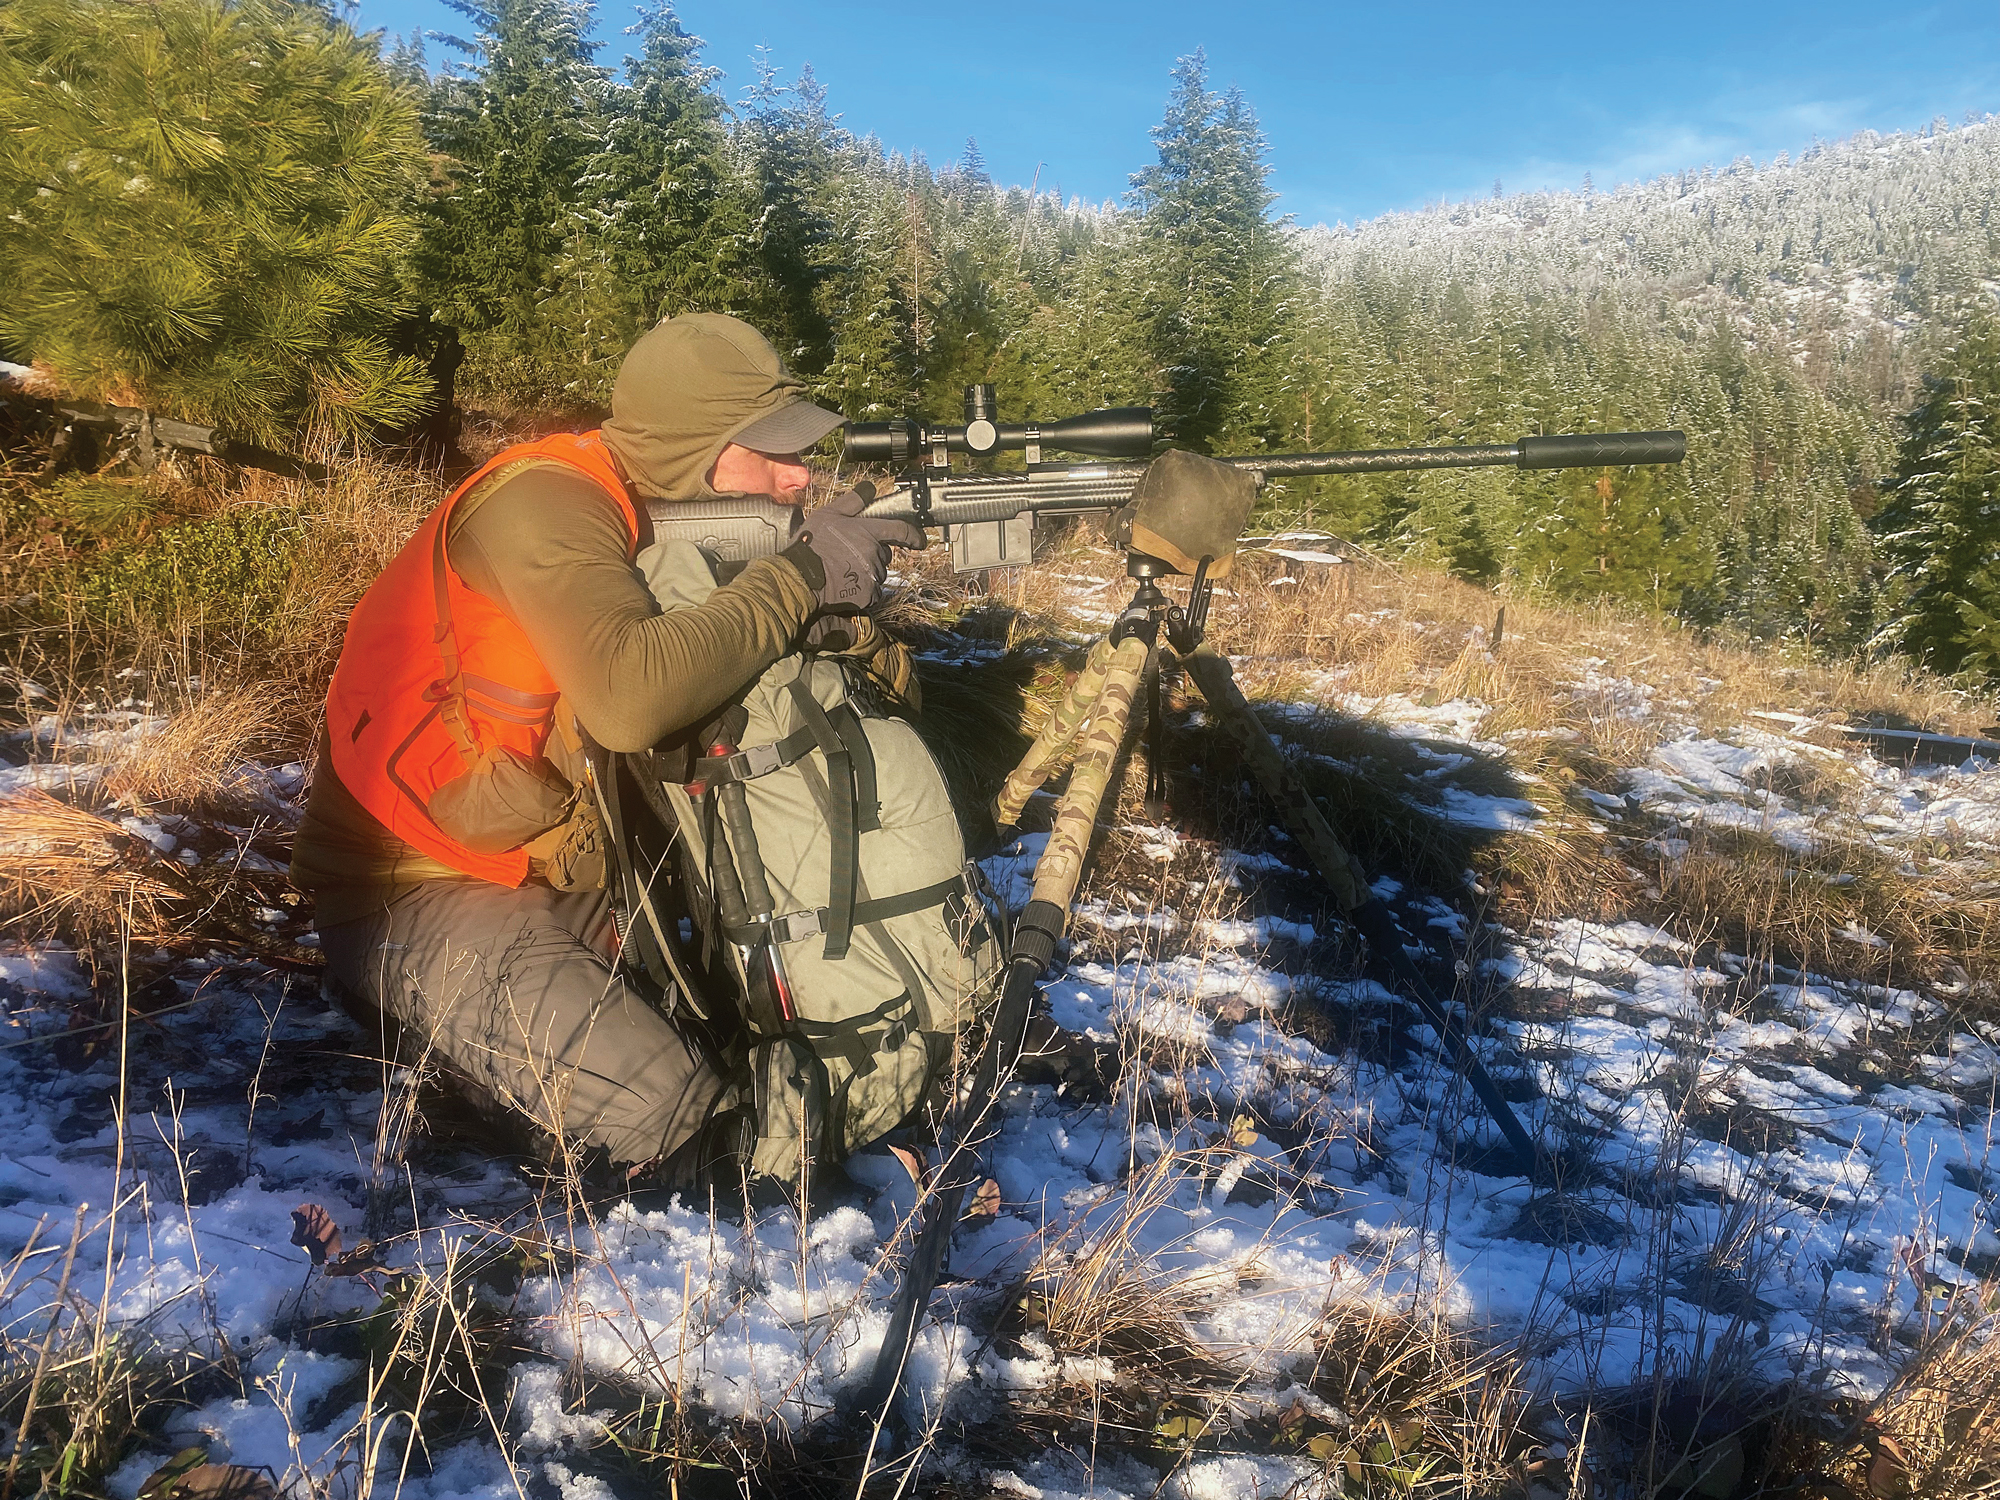
Kneeling
While seated shooting is the most stable, kneeling is sometimes required to shoot over rocks, tall grass, or brush. Following the same process of prepping the tripod and rifle to the proper height ensures the shooter is set for proper cheek weld and contact with the recoil pad. Most often, I add about 8-10” of extension in the middle leg from the sitting position to get the proper height for kneeling. Everyone is built differently, so find what works best for you. Build your position around having both knees together with your feet tucked flat and your butt resting atop your heels. If time permits, I use my Phoenix Shooting Pad under my knees to help keep sharp rocks or freezing snow and ice from destroying my kneecaps. Try to avoid flexing your feet under your butt with your boot tread still touching the ground. This will add a ton of muscle tension under your torso which will create shaking and fatigue. The key to kneeling and seated shooting off a tripod is reducing muscle tension and ensuring a natural point of aim behind the rifle.
Once you have built solid positions behind the tripod with your rifle mounted and feel comfortable, take a sharpie and mark the leg position for sitting and kneeling to make reference points for rapid deployment. Use different colors or multiple bands to separate each position if needed. This is a huge time saver for hunting or competition shooting when it comes to setting up a tripod under stress.
Standing
The standing position is the least stable and requires the most practice to get comfortable with for most shooters. With the tripod legs extended, you want to have the rifle about nipple high when you’re standing up straight behind the rifle. This will allow you to lean forward slightly and load the rifle and tripod leg while keeping a wide stance with your feet just outside of shoulder width. If the tripod is too high and you have to stand flat-footed and straight-legged, you’ll get a big push from recoil moving the tripod off target and lose your target.
The stance for standing is crucial for recoil management to see your impact after riding through the recoil impulse and stay on target for follow-up shots. Be sure to work this one thoroughly in the off-season at 100-400 yards and get comfortable. If your rifle doesn’t return to the target after shooting, change your stance and work it out. Obviously, if you’re shooting a 7-lb 300 RUM off a light tripod, it’s going to move a lot. With some practice, you’ll be able to stay on target with minimal adjustment after the shot. With a good tripod and rifle setup, you’ll be able to spot your impacts at 500-600 yards and beyond with ease.
Learn Your Weapon
Just like in any field shooting position, keep your rifle scope below 15x when shooting from the tripod positions. The lower power range and wider field of view will help get you back on target faster to spot impacts. Many hunters struggle with positional shooting as they keep the power up to 20-25x and the wobble in the reticle can be nauseating. Lowering the magnification will help settle the reticle and make aiming a whole lot easier.
It’s also not uncommon for your zero to wander slightly from the bench where the rifle was zeroed to shooting off the tripod. The stock or chassis you use will flex and respond differently under recoil and can sometimes move your point of impact 1-2” at 100 yards, so be aware of this change potential in your setup. The softer injection molded stocks of most factory rifles are the most vulnerable to this change. Also, some aluminum chassis rifles I have shot will change impact, and the whole chassis is a tuning fork, so vibration travels throughout the entire rifle.
For most hunting distances of 100-300 yards, these small changes won’t really matter if you make a good shot on the animal, as you get 6-8” of wiggle room in a deer’s vitals and 8-10” on an elk. Just be sure to work your system out before the season to avoid losing any confidence you had in your rifle when you first shoot it off a tripod two days before the opener and find that your rifle and tripod don’t jive. Start now and have a system dialed by summer.
Just like anything, shooting a high-power rifle off a tripod takes some practice to master. I always recommend shooters to train with a rimfire 22LR or .223 Rem-chambered rifle to help get reps in at lower costs than training up with your 300 PRC hand loads if you’re on a budget and want to maximize your trigger time. The extra reps will ensure you get the tripod set up properly for a variety of positions.
Once you’re comfortable with sitting, kneeling, and standing on flat ground, start incorporating angled hillsides and obstacles to work through the reality of the hunting terrain we find ourselves in every fall. If you start your training with a smaller caliber rifle, be sure to finish training strong using the hunting rifle and ammo you plan to use in the field to establish confidence with your rifle and setup.
As always, help keep the gun conversation alive by contacting me at colton@westernhunter.net with your questions or suggestions for future product reviews. Follow me on Instagram @papwinkle to see my online posts and reviews on all things precision rifles to help make you a better rifleman.
And remember, “Only accurate rifles are interesting.” -Townsend Whelen