NOTICE: Certain links on this post may earn a commission for Western Hunter Magazine from Amazon or our other affiliate partners when you make a purchase. Thank you for your support.
How To Cape An Animal For a Shoulder Mount
Over the last several years there’s been a sharp uptick in the “superhero” genre of the entertainment industry. It seems every media giant is clamoring for their piece of the superhero pie. Thankfully, and not surprisingly, there’s also been an increased awareness of the actual heroism among real and ordinary people.
Nurses, teachers, firefighters, police, and others are increasingly being recognized for their almost routine acts of courage. Out of these two trends has emerged an expression: “Not all heroes wear capes.” I happen to like that expression, as I’m more impressed by real heroes than I am by fictitious ones. Ironically, as a taxidermist, I’ve found that the real heroes of backcountry hunts generally don’t wear capes either, but they do know what to do with one when the need arises.
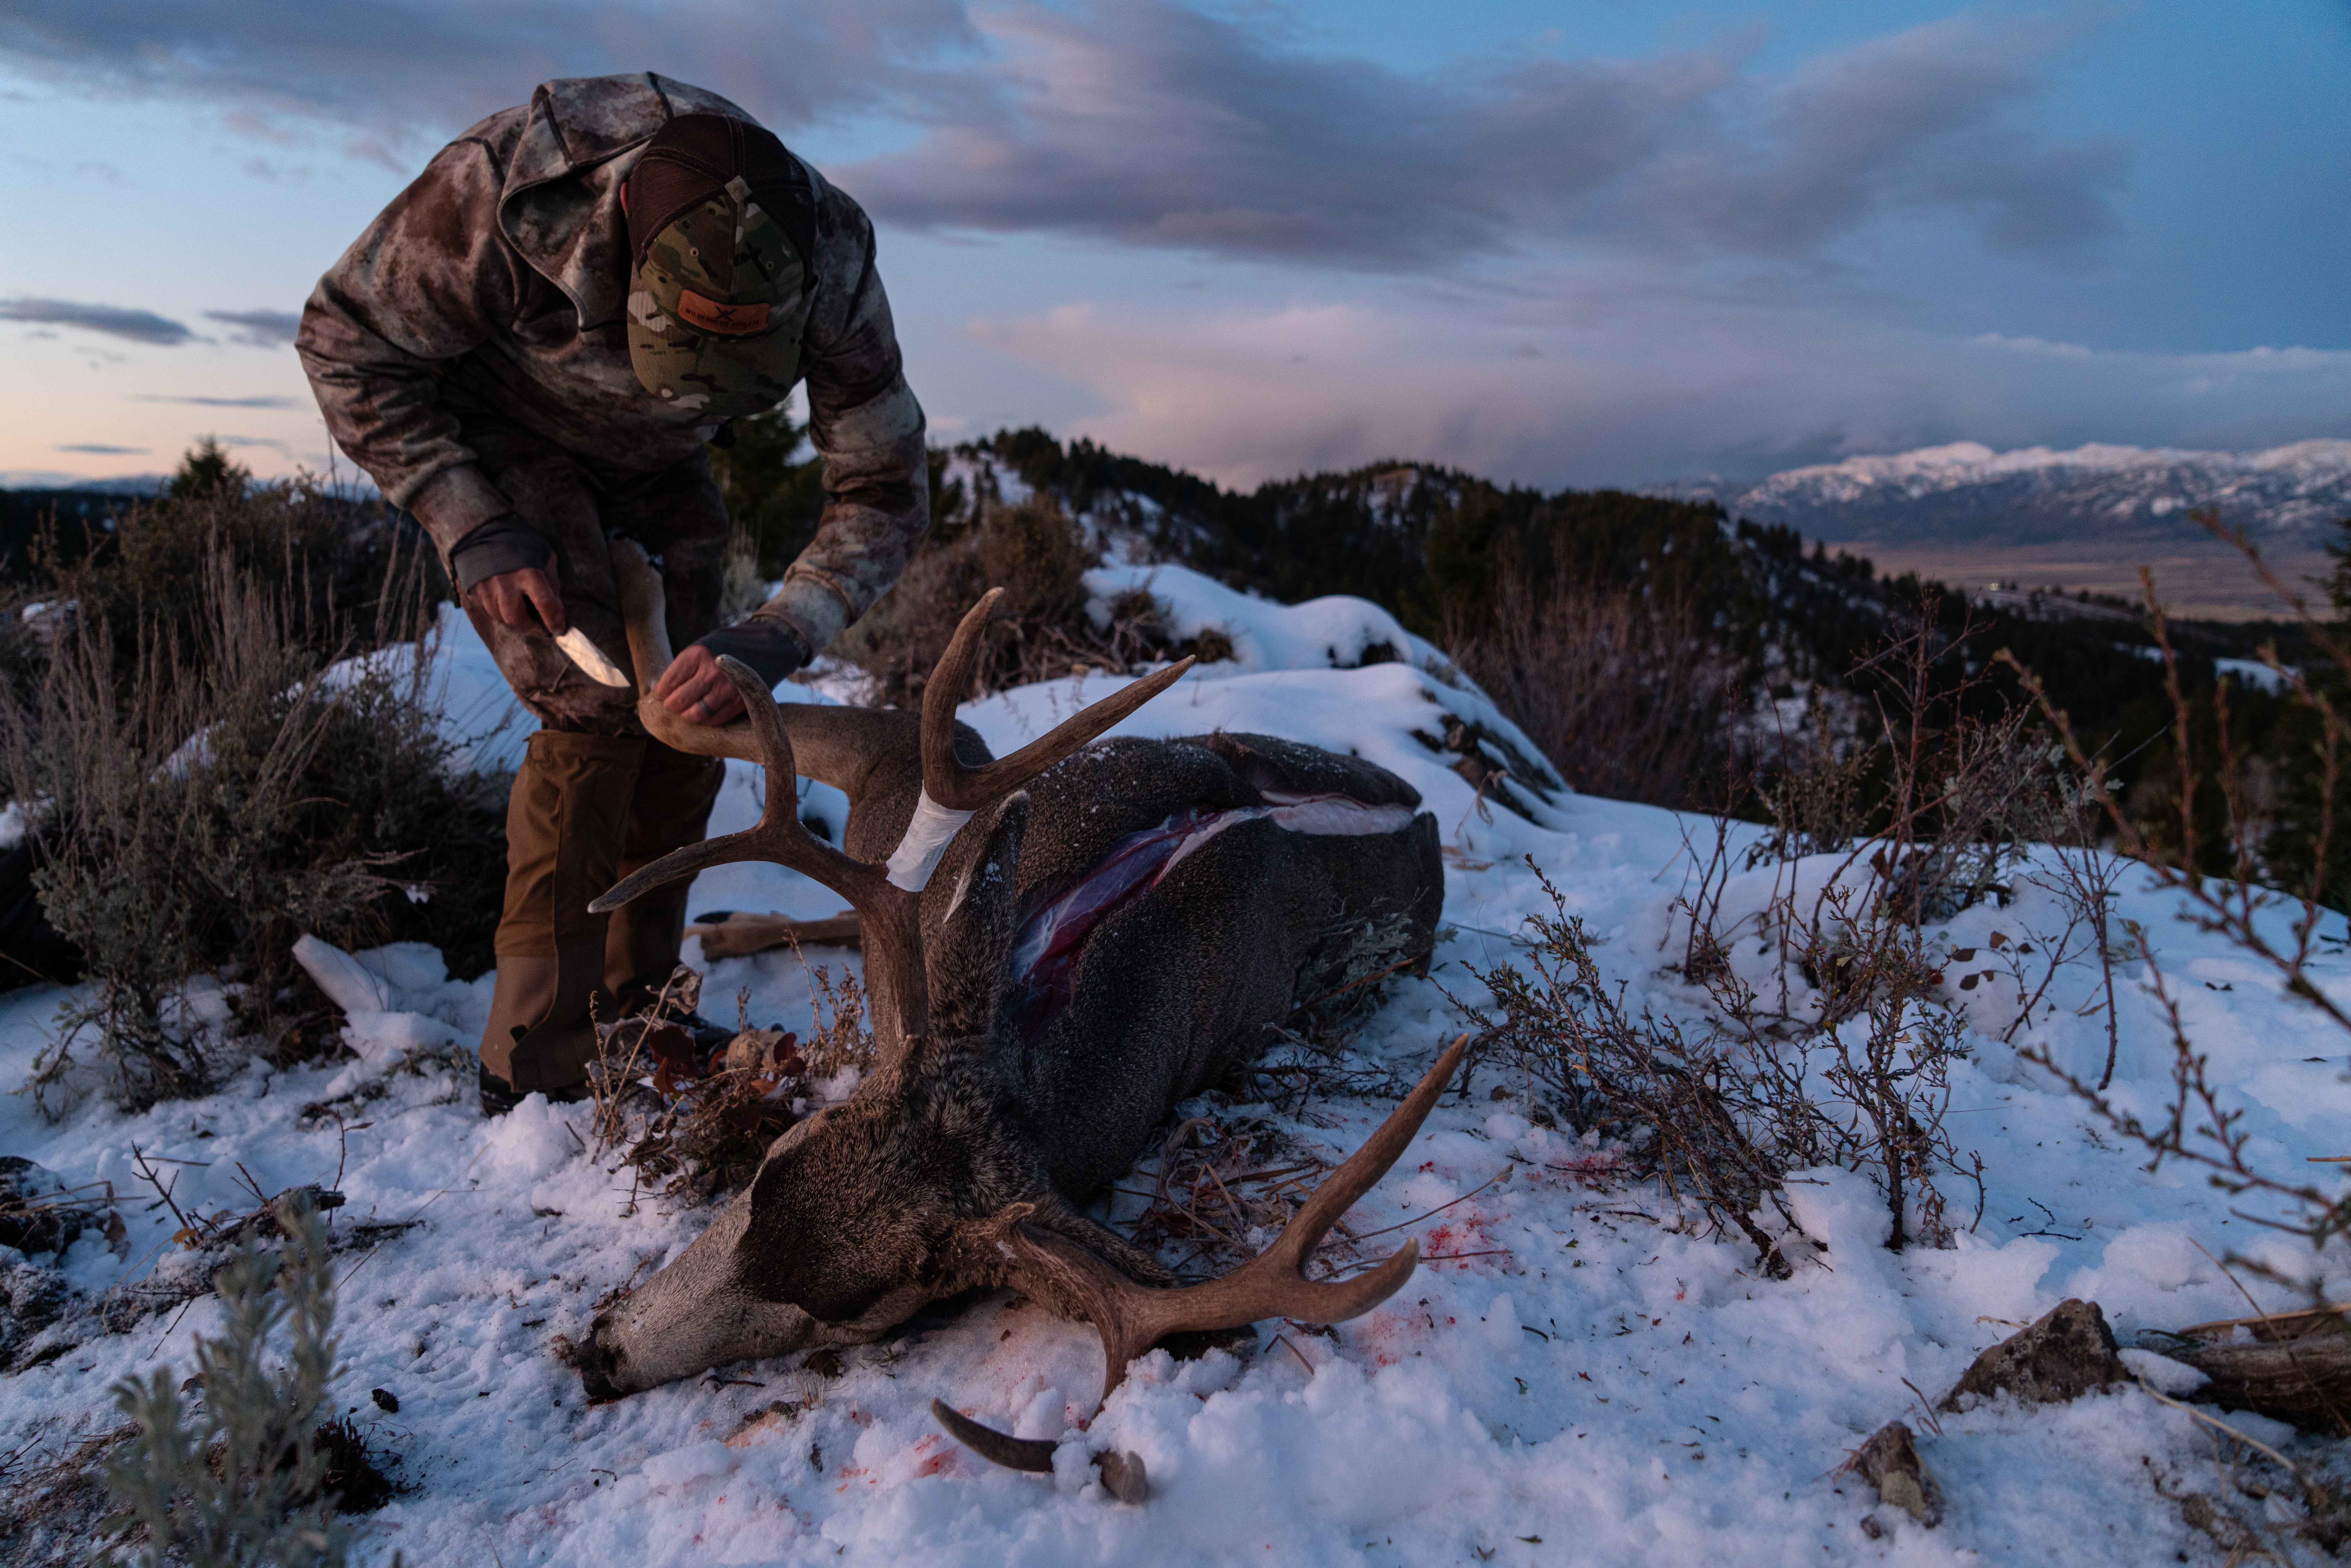
This article is intended to teach you how to be the person that every successful hunter (and their taxidermists) would like to have present for the caping process of their hard-earned trophy. First, I'll explain some of the more technical and challenging areas. Second, I'll share how I generally break down an animal for shoulder mounting purposes. Finally, I'll share some ideas on keeping the hide in good condition while still in the field.
Over the years I've noticed several areas of the hide that tend to be problematic when hunters skin an animal themselves. These areas include the eyelids, the mouth and nose, the bases of the antlers, the brisket/leg area, and the overall length of the cape beyond the shoulder.
It's important to note that on thick and long-haired animals (deer, elk, bear), incidental holes during the caping process are not that big of a deal, so long as the hole is in a section of cape that has thick or long hair. Skinning mishaps, bullet entry holes, and even large cutting diameter broadhead holes are often easily repaired. However, eyelids, nostrils, and skin around the lips generally have short or no hair, and therefore even a small hole can be a big problem.
Taking extra time and care around these areas will save big dividends in the end product. A good rule of thumb in these areas is to keep the cutting edge of your knife directed toward bone at all times. This cuts the connective tissue furthest from the skin, which spares unneeded holes. The face skin of most big game animals ranges between about 1/8th inch and 1/16th inch thick. Eyelids, nose pads, and lips are thinner yet. You can easily demonstrate this principle to yourself. Pinch the skin of your eyelid and compare it to the skin of the back of your neck. The fine motor requirements of eyelids, noses, and mouths require thin skin, and thin skin is easily damaged. Slow down in these areas, and think twice before cutting.
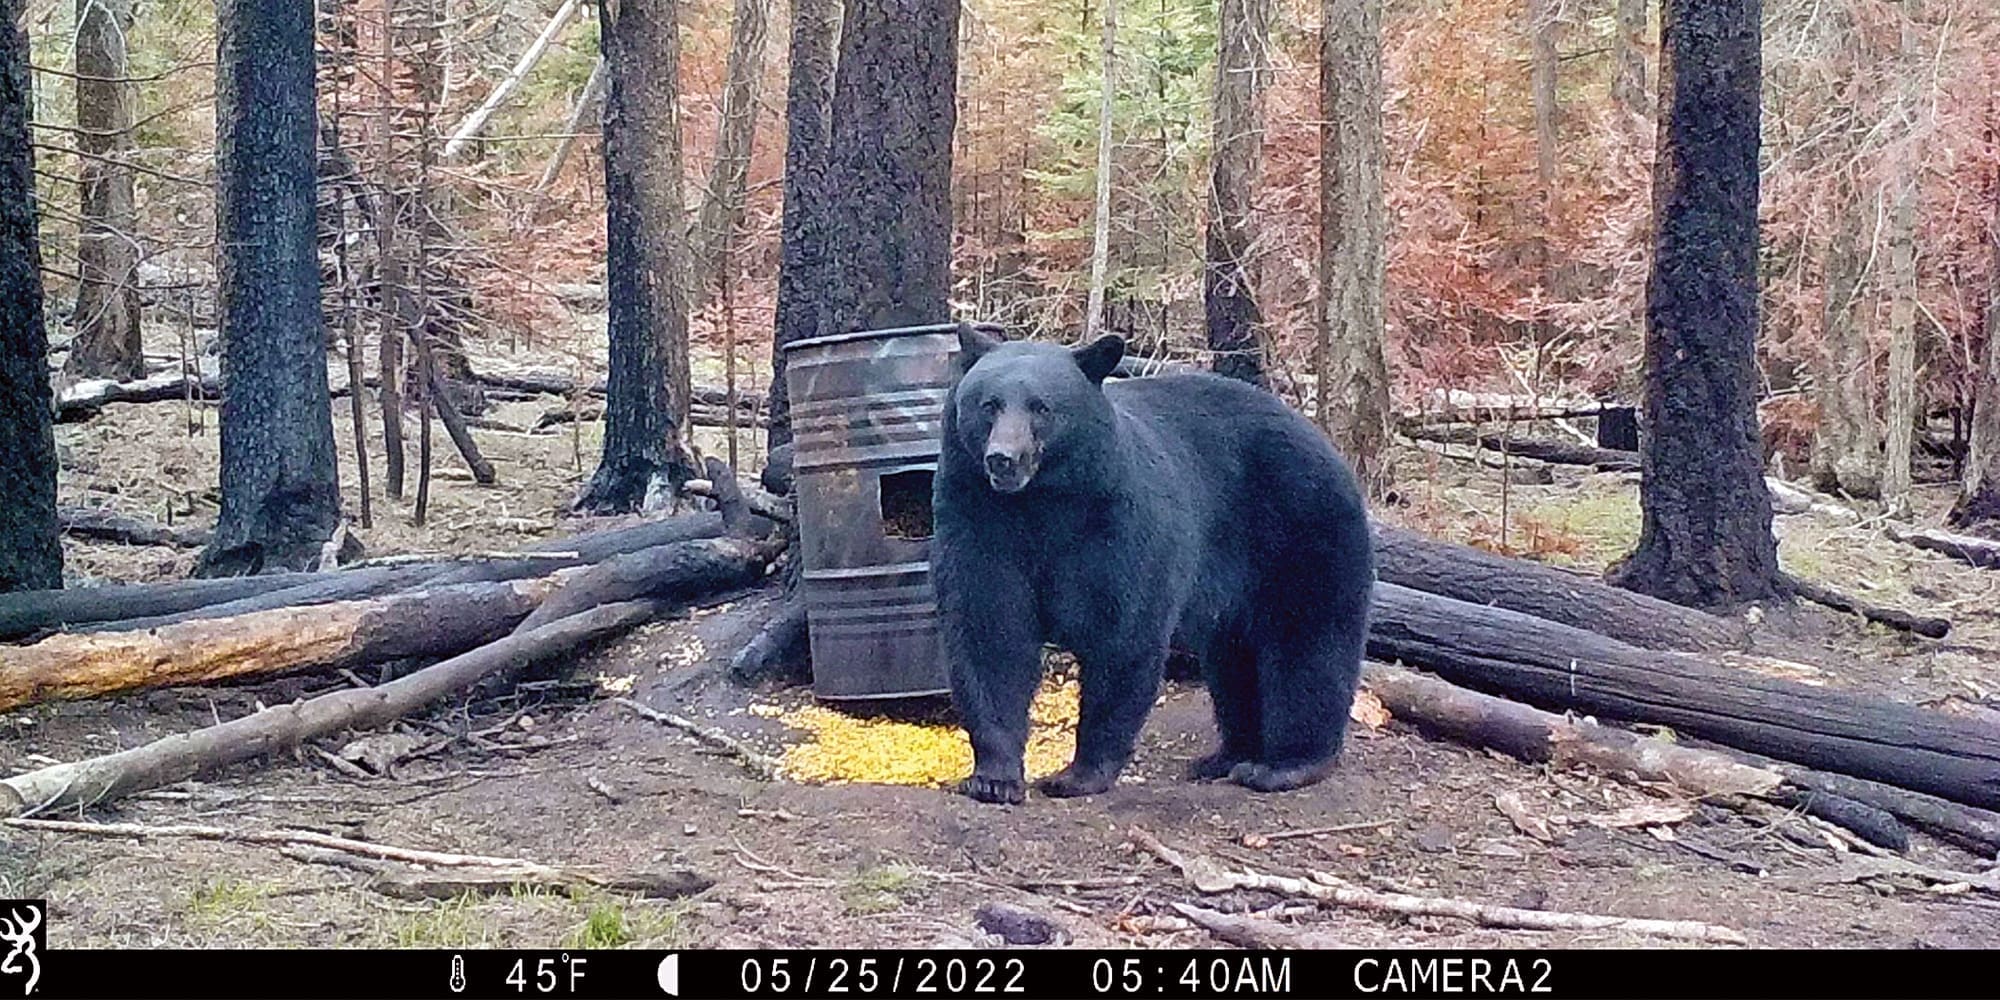
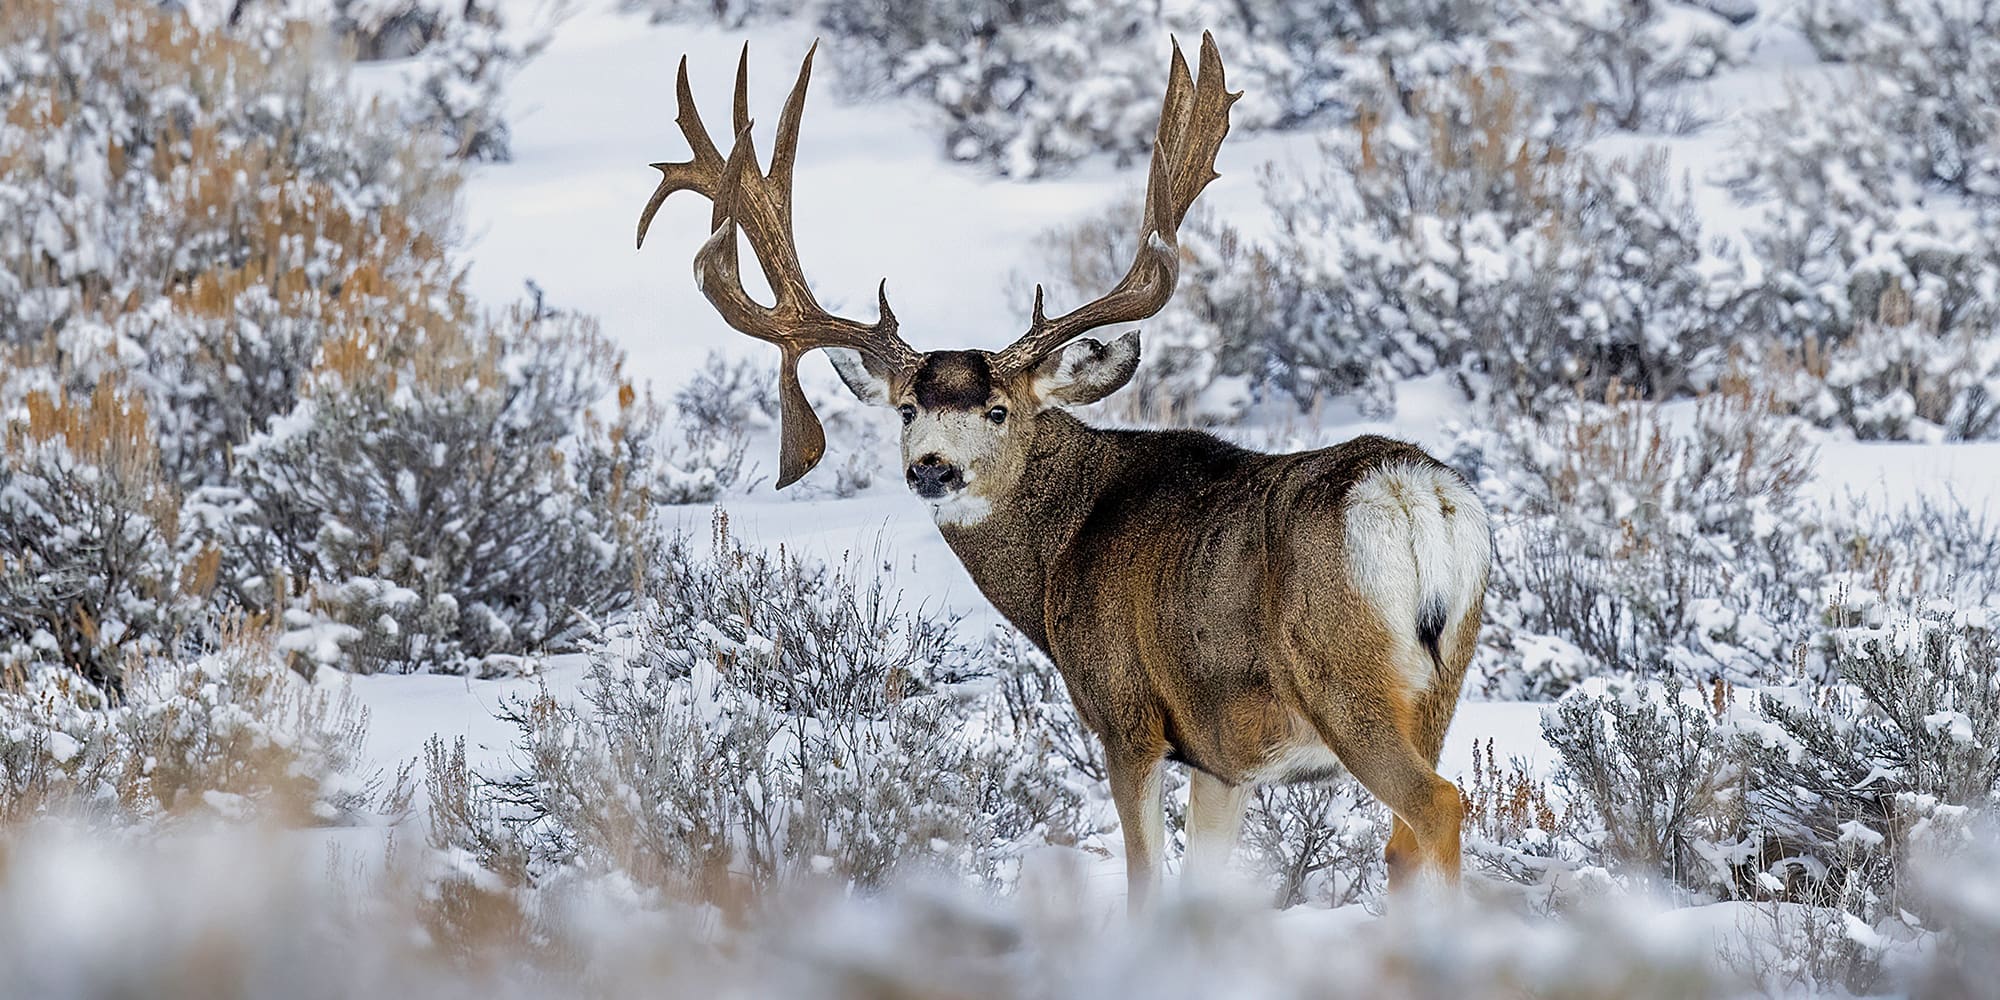
Another common caping mistake includes the bases of the antlers, particularly during the early season. Early season hides can make for exceptional mounts because fine details molded in the form can be captured through the short, fine hair. However, this poses a problem for skinning, as it leaves little margin for error.
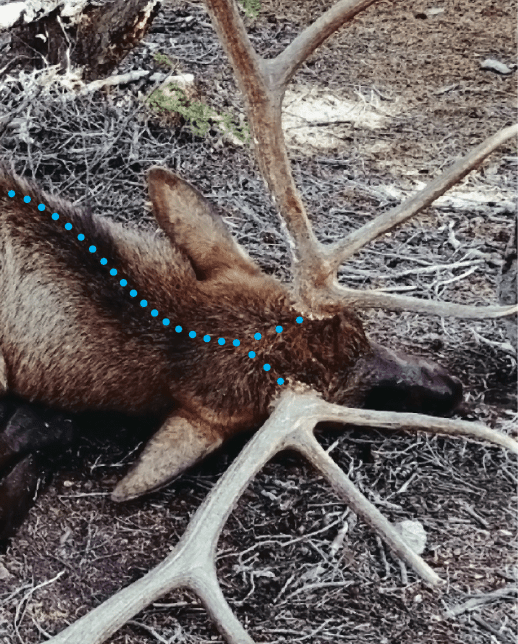
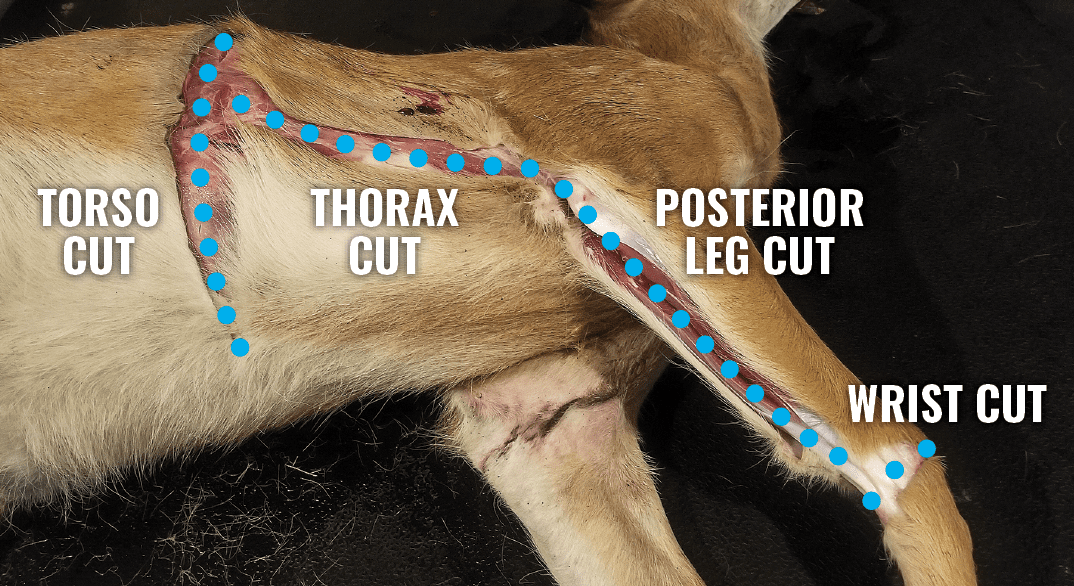
Before I address the fine-tuning approach to the area around the antlers, I should explain that there are three basic options to get you started here; the "7" cut, the "T" cut, and the "Y" cut. Each cut refers to the method used to skin the animal between the bases of the antlers. Looking at the animal's head from above, the "7" goes from one antler base straight across to the other antler base, then diagonally down to the center of the neck between the ears, forming a “7”. The "T" cut replaces the diagonal cut with a simple perpendicular cut forming a "T" between the bases. The "Y" uses two diagonals from the bases which connect to the spine cut between the ears.
It really makes little difference which method you choose, but your taxidermist may have a preference, so you may want to ask prior to your hunt. I prefer a “T” or “Y” cut on elk because of their tall pedicles, which are the shafts of bone that the antler grows out of. I prefer a “7” cut on deer because it makes for more efficient stitching. Now, that's the easy part regarding this area. In many cases, hunters have difficulty removing the hide from around the bases of the antlers. The reason for this is that the skin is firmly connected to the pedicles, and the skin is essentially glued to the bottom edge of the antler base itself.
These combined factors often result in a hacksaw-style cutting technique with the knife, which leaves jagged chunks of hide still connected to the bases of the pedicle/antler transition. These jagged cuts are often difficult to properly repair or conceal during the mounting process, particularly with early-season animals because there simply isn't enough hair to hide the flaws. I’ll share some tips regarding this area later on.
Now, the aforementioned issues each have the potential of detracting from the overall quality of a finished mount. Eyes, lips, noses, and pedicles that require significant repair work will almost certainly be observable from a discerning eye. That said, most of those mistakes can be somewhat concealed by a good taxidermist. One thing even the best taxidermist cannot do, however, is make something out of nothing. I'm referring here to the brisket, leg, and overall length of the cape beyond the shoulders. I've had several clients bring me self-caped trophies only to find that essential pieces of hide are not simply damaged but missing altogether. While patches from other spare hides may be an option, in many cases a new cape is required.
Replacing quality capes can cost several hundred dollars, so a basic understanding here is key. Generally speaking, skinning is very simple, but it is not necessarily easy, particularly in areas of the hide where there are tucks or folds of skin. The armpit area is one such region. This transition between the brisket and the leg creates opposing angles, which lead to difficulty while skinning. Not only can it be difficult to see what is being cut, but it can be confusing to figure out where to cut. I’ll share in detail how to best approach this area.
Ok, let's put it all together. Before making any incisions, take pictures. In fact, take lots of pictures. These will not only serve as great memories for yourself, but they could help your taxidermist. One area of interest for me when I'm not the one caping the animal is the angle of the rack related to the bridge of the nose. There's a fair amount of variance between animals, and without pictures, it can be difficult to recreate unique features.
For the main incisions, I recommend a sharp, stout bladed knife. Mature animals often have very thick skin, especially along the spine and near the antlers. A mature bull elk can have skin in some areas that’s nearly 1 inch thick. The Havalon Double Folding Titan is a great choice in that it has both a solid fixed-blade as well as a replaceable surgical blade all in one. Replaceable surgical blades work great in the detail areas like the mouth, nose, and eyes. Choose your knife accordingly, and if you plan to process more than one animal, a good field sharpener always comes in handy.
Spinal Incision:
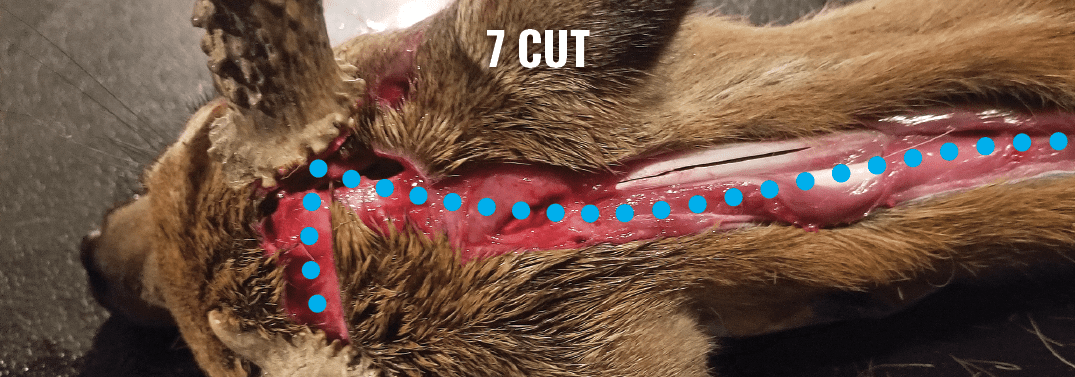
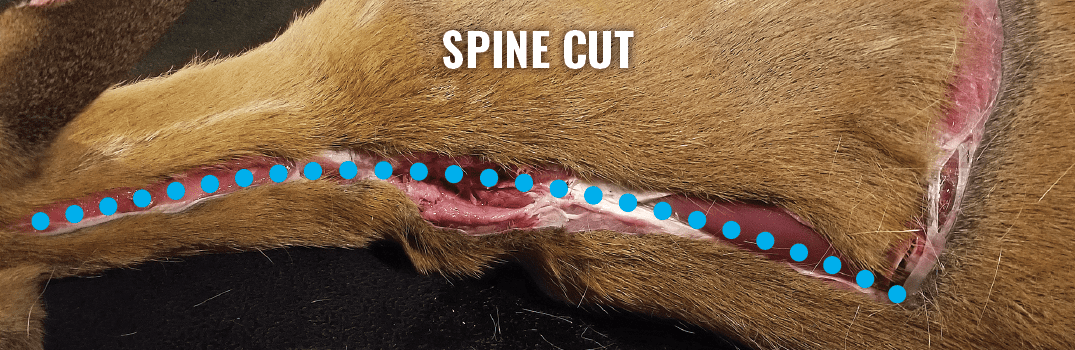
Since you’ll be taking the meat from the animal, it’s best to start at the base of the tail and simply follow the spine to the center of the ears. Create your 7, T, or Y cut when you reach the head.
Torso Incision:
You’ll need to make the torso incision by cutting perpendicular to the spine and down to the bottom side of the belly. I like to start my incision at the spine about halfway back on the ribs. When in doubt, start further back and leave more hide for your taxidermist than you think might be necessary. Hide can be trimmed if there's too much, but as I mentioned, it's hard to replace if there's not enough.
Front Legs and Thorax Incisions:
With the torso cut complete, you’ll now make the incisions for the animal's front legs and brisket area. The best and easiest way to tackle this area is with the aid of a good friend or a good piece of rope, whichever is more convenient. With the animal on its side, pull whichever front leg is off the ground up and away from the other front leg. This will stretch out the skin and open up the armpit area, allowing you to see what you're cutting. This is important, DO NOT cut the skin between the legs.
You'll notice on nearly all shoulder mounts that there is a significant length of brisket between the animal's legs. Cutting straight between the legs will remove this hide. With some animals, like deer, one mounting solution is to shorten the styrofoam form to make it fit the shortened hide. This isn't a good option with most elk, as their antlers extend toward their back, not forward. Elk forms often cannot be altered in this manner without causing space problems between the antlers and the wall.
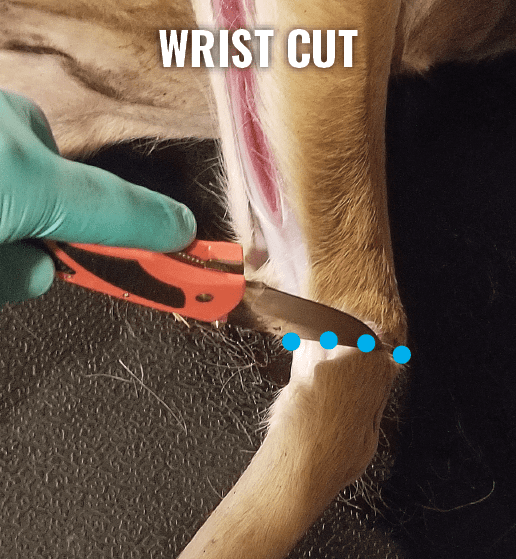
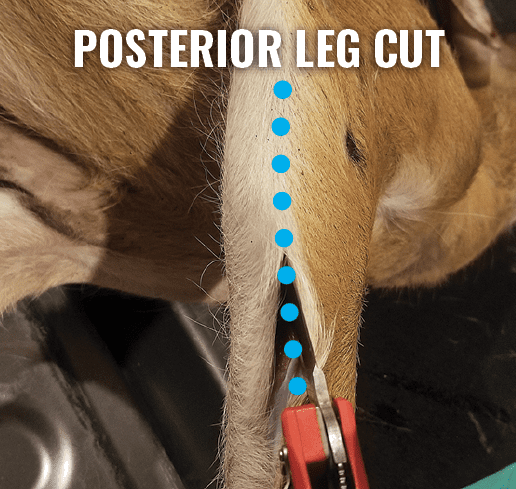
Simply put, don't cut the brisket. Instead, make a circumferential cut around the animal's ankle, near the hoof, which will ensure plenty of front leg hide is available. Then, on the posterior side of the leg, follow the seam of hair up to the elbow to the body. Once you've contacted the body, finish the cut by cutting along the thorax toward the rear of the animal (ie, perpendicular to the ribs) until you’ve intersected the torso cut.
Skinning the Shoulders, Neck, Legs, and Brisket:
Now you can begin skinning/peeling the skin of the shoulder and neck down and away from the spine, cutting and pulling simultaneously. Try leaving as much meat on the carcass as possible. A meat-free cape cools much better than one with large chunks of meat or fat attached, and it can be significantly lighter for the long haul out. Also, be mindful of setting the exposed skin in any dirt or debris. Rather, fold or roll the hide (fur side out) as you proceed.
Keep peeling and cutting your way to the animal's upper neck. Remove the hide from around the leg, again with your assistant holding the leg up for easy access to the underarm area. Begin carefully skinning the thin brisket/armpit skin forward and between the legs, then up the neck. You’ll want to pause your caping process here and remove all meat (hind quarter, shoulder, backstrap, tenderloin, neck) from this side of the animal. Then, flip the animal over and repeat the torso, neck, leg, and brisket procedures on the other side.
Detaching the Ears:
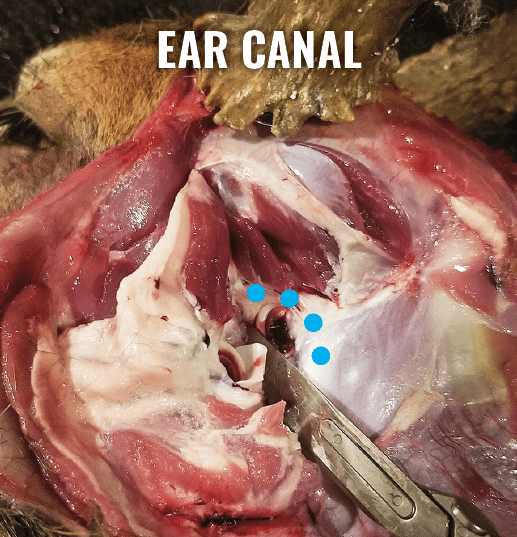
Returning to the head, you'll find that the ears will make it difficult to completely remove the skin from around the pedicles. Since you've already made your 7, T, or Y cut, you can expose the bases of the ears with a little peeling/skinning. Once the ear butt is exposed, simply cut through the base of the ear where the thick meat contacts the bone of the skull. Continue pulling and skinning the hide forward toward the nose until you encounter the antlers.
Antler Base and Pedicles:
The best way to approach the antler bases is simply to use a pry bar. Rather than trying to cut this area, I'll usually just use a flat head screwdriver and force the hide around the circumference of the antler. The skin in this area is incredibly tough, and can usually be pried away from the pedicle without tearing. Start where your 7, T, or Y connects to the antler, and force the flat screwdriver tip between the hide and the bone of the pedicle. Then, simply pry the hide away from the bone and repeat. You may need to use your knife to disconnect some of the connective tissue that's below the antler base.
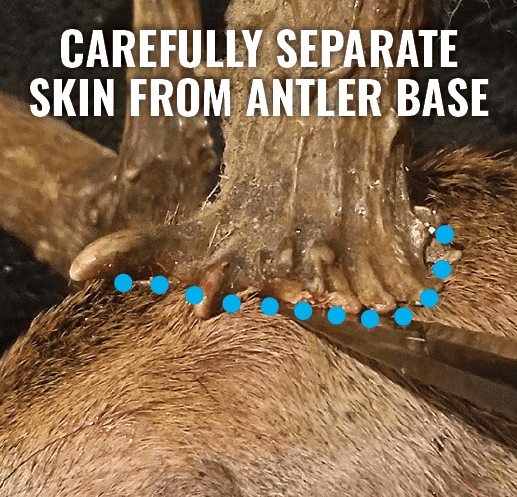
Realizing most of us don't hunt with a toolbox in our pack, the secondmethod requires some counterintuitive knife work. The general rule of thumb when skinning any animal is to cut from the inside out, which avoids cutting the hair and making a hairy mess on the meat. Around the antler bases, however, cutting first from the outside can be helpful. Again, the skin is extremely tight to the pedicle in this area, and it's connected to the bottom edge of the antlers.
While pulling the hair down and away from the antlers, a cut can be made circumferentially between the antler base and the hide. This effectively removes the "glue" that holds the skin to the antler base. Then, starting where your 7, T, or Y connects to the antler base, carefully use the tip of your knife to skin the hide around the pedicle until it's completely free.
Eyes:
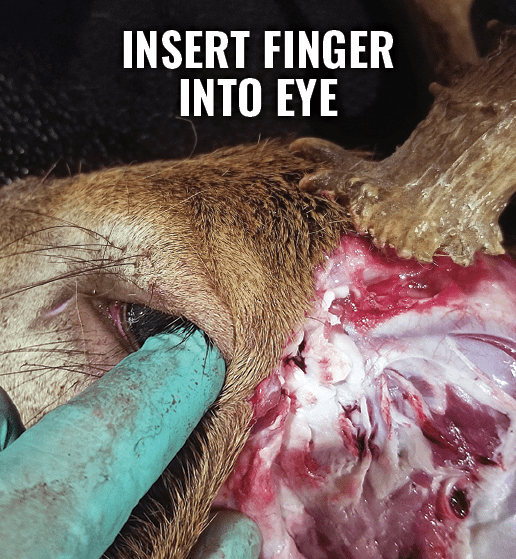
Continuing forward, expose the forehead as well as the area below the antler between the ear canal and the eye, being extremely cautious as you approach the eye. Here you must slow down and use a surgically-sharp blade as you want to slice, not saw, your way around the eye. With the knife in your dominant hand, use your other hand to grab the hide and pull tension. Do so by inserting your index finger into the lateral eye socket and grasping the loose hide below the antlers with your thumb.
Carefully continue forward and begin cutting the white, inner skin of the eye, using your inserted index finger as a guide to ensure that you do not cut the outer eye skin or the eyelids. Applying constant pulling pressure to the hide, carefully cut the white inner skin around the entire orbit of the eye, being cautious not to cut the tear duct which is located in front of the eye.
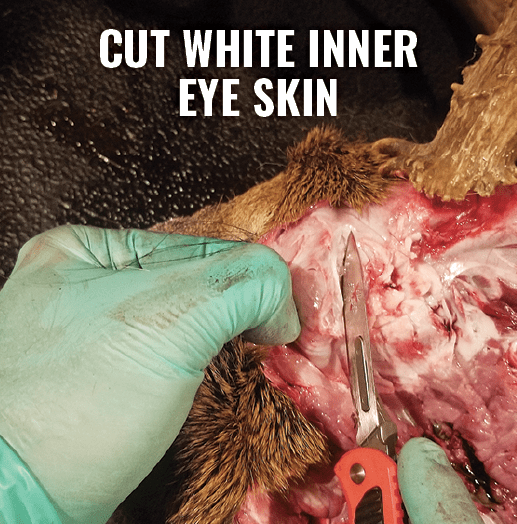
With elk, the tear duct can be skinned in a way similar to that of the eye, using the finger and thumb technique to slowly pull and cut the thin skin out from the deep indent of the tear duct. Deer don't have room within the tear duct for a finger, so careful use of the knife's tip is necessary to trim the connective tissue without butchering the skin itself.
Nose and Mouth:
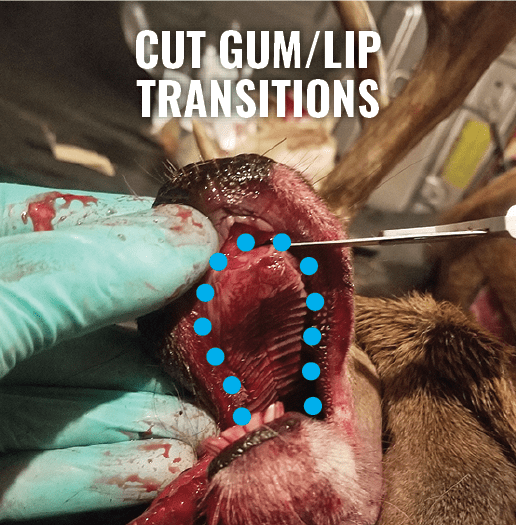
You're almost there! All that remains is the nose and mouth, which are easy compared to the eye. Simply open the mouth and begin cutting the gum line where the gums meet the inner tissue of the cheeks and lips. This is easily done by grasping the lower lip and applying pressure downward, exposing the inner lip and gum. Cut through the gum line to the jawbone from the front teeth back to the rear molars on each side.
Do the same thing with the top gum line by lifting upward on the upper lip and nose. The upper and lower incisions can now be connected behind the molars by carefully cutting through the inner skin of the cheeks. Grabbing the cheek with your non-dominant thumb inside the cheek and fingers on the fur side of the cheek, you'll be able to determine when you've cut through the inner skin.
Now, returning to where you had finished the tear ducts, continue pulling and cutting the hide forward to the nose. Once the cartilage of the nose is exposed, cut through the cartilage, and follow the bone down and forward to the front tip of the upper jaw. At this point, you can simply skin the rest of the face until your forward progress meets the inner mouth incision, at which point you are finished.
Basic Cape Care:
All that's left now is ensuring that the well-skinned cape stays well. Be certain to thoroughly remove any bloodshot tissue around any wounds, as blood traps heat and moisture, which are the breeding grounds for bacteria (unchecked bacteria results in hair slippage). If it's going to be a while before the hide can be frozen, salting any cleaned bloodshot areas is a good idea. However, don't salt the entire cape yet, as the cape needs to be completely fleshed before it’s fully-salted.
More importantly, cool it immediately by draping it over a branch in the shade. Once the cape is cool to the touch, place it in a game bag, and make plans to get it to cold storage along with the meat as soon as possible. Prior to freezing, place the hide in a plastic bag to prevent freezer burn of the eyes, nose, and ears.
Now, I know that all sounds complicated, but believe me, this is more difficult to explain than it is to do. In fact, with some practice, carefully caping the head can be done in under 20 minutes. I recommend practicing on any game head you can if at all possible. Even practicing on small game can prepare you for nearly every step of the process. Best of luck on your next hunt, and even if you don't feel heroic caping out your trophy, remember that even Superman has a humble side.