NOTICE: Certain links on this post may earn a commission for Western Hunter Magazine from Amazon or our other affiliate partners when you make a purchase. Thank you for your support.
7 Steps to Reloading Accuracy
One of the more daunting tasks of reloading accuracy is figuring out which combination of the bullet, powder, primer, and seating depth is needed to get the most reloading accuracy and consistency out of their rifle. Thankfully, the competitive shooters out there have burned mountains of powder and shot out barrels figuring out systematic approaches to reloading that beat the heck out of random trial and error.
Methods I’ve explored include ladder tests, the Audette test, and the latest I’ve run across is optimal charge weight method (OCW). These methods are all capable of leading you down the path to a good shooting load for a rifle. I’ve used them all successfully and my current methods blend aspects of all of them.
Before you can be assured any process used to refine a load will work, you have to evaluate your rifle, the quality of your ammunition (reloading technique), and last but not least your personal ability to consistently execute the shots. Interpreting the results on a target will be difficult at best if any of these three elements aren’t up to par.
My first attempts at reloading was admittedly a little frustrating until I made improvements on all three fronts. First, I bedded the action of my rifle and free-floated the barrel – big improvement. Next, I learned to be more meticulous with my brass preparation. I started paying very close attention to seating depth and bullet runout (wobble), and I bought tools to measure and correct both. Once I could measure the issues, I upgraded my reloading equipment and learned better techniques to correct and keep both consistent. I also started annealing case necks to keep bullet tension consistent, load after load. The result – big improvement.
Finally, I realized the biggest problem all along was the nut behind the trigger was loose (me)! So, I learned how to shoot more consistently off a bench and a bipod. Shooting technique is ultimately more important than the first two factors, especially with a heavy recoiling hunting rifle. If you can’t shoot the rifle well, all the load development in the world won’t make it shoot consistently!
Pay attention to where your barrel is pointing after your rifle recoils and you’ll likely notice that you end up well off target, and oftentimes in a different direction and amount after each shot (I was). Once I realized my shots were often missing in the same direction as the rifle ended up pointing, I knew I had to start building a better shooting position to allow the rifle to recoil in-line with the target, stop trying to arm-wrestle the crosshairs onto the bulls-eye and establish a better natural point of aim. Once again, with a little research and practice – a big improvement.
After those lessons, load development got a lot easier! Next, I learned that working up loads and reloading a ton of test rounds over and over is fun, to a point, but it can turn into “work” real fast if you try to take it too far – especially with a hunting rifle. You can read all day about rifles that shoot ½ MOA (about a half-inch at 100 yards), but making that happen isn’t realistic for most rifles and people. MOA stands for minute of angle. One degree is divided into 60 MOA. Most scopes have ½ or ¼ MOA windage and elevation clicks. One MOA is 1.047” at 100 yards and 10.47” at 1000 yards.
I’ve shot out a barrel in search of finer reloading accuracy, and in doing so, I’ve come to realize there’s a certain point for every rifle and shooter that is “good enough”. For a bench rest shooter, the hunt for “good enough” never stops.
If you’re wired that way, bench rest is your game. For hunting rifles, once you get much below 1 MOA, other factors like learning to shoot from field positions and learning to read wind become far more important than trying to shrink your groups by another ¼” off the bench. I’m not saying we shouldn’t own the best equipment we can afford and develop loads to maximize a rifle’s potential. I’m simply trying to put in perspective and advising you not to go overboard with the pure reloading accuracy addiction. Once you get it shooting well, go burn up your barrel shooting critters instead of ladder tests! Here are the steps I use to work up reloading accuracy for my hunting rifles.
1) Start with a Great Bullet
The number one obstacle to hitting targets at longer ranges is wind drift. Because of this, I shoot the heaviest, highest ballistic coefficient (BC) bullets that are designed for hunting. The latest reloading project I’m working up is for the new Berger 195-grain EOL Elite. It has a G7 BC of .387! That’s 12% higher than the best 180-grain offering. The downside is that you need a fast twist rate to adequately stabilize high BC bullets, and many factory barrels aren’t optimized for them. Check twist rate requirements with Berger’s Twist Rate Calculator.
Your bullet needs may differ substantially from mine. You may be looking for a hard-hitting bullet for dangerous game, or a lightweight laser-beam bullet to minimize the need to range coyotes in broken country. Select the best bullet for your personal needs. The type of bullet you choose will not affect your reloading accuracy.
2) Choose a Great Powder
To choose a powder, consult your reloading manual, powder manufacturer websites, and contact the bullet manufacturer for load data. I contacted Berger via email to get load data for this new bullet since neither my reloading manual nor the Hodgdon and Alliant websites had data for anything similar. Berger responded within 24 hours with this table.
| 7mm STW - 195 Grain, PN: 28550 Bullet, 3.759" COAL, 26" Barrel. 9/14/2015 RB | ||||||
| Berger 195 gr. EOL 7mm Bullet | Powder | Start Load In Grains | Approx. Start Velocity | Max. Load In Grains | Approx. Max. Velocity | Approx. Fill Ratio |
| 195 Grain | RL25 | 69 | 2709 | 72.5 | 2820 | 92% |
| 195 Grain | RL33 | 79 | 2764 | 83.1 | 2918 | 96% |
| 195 Grain | RL50 | 82 | 2746 | 86.4 | 2914 | 101% |
| 195 Grain | H4831 | 66.5 | 2683 | 69.8 | 2797 | 91% |
| 195 Grain | H1000 | 71.5 | 2712 | 75.1 | 2838 | 96% |
| 195 Grain | Retumbo | 74.5 | 2745 | 78.2 | 2866 | 98% |
| 195 Grain | US869 | 83 | 2697 | 87.2 | 2853 | 104% |
| 195 Grain | H5OBMG | 79 | 2693 | 83.4 | 2867 | 104% |
| 195 Grain | IMR 7828 | 67 | 2733 | 70.3 | 2849 | 92% |
| 195 Grain | Norma 217 | 74.5 | 2745 | 78.2 | 2871 | 100% |
| 195 Grain | VV N170 | 73.5 | 2659 | 77.6 | 2804 | 99% |
| 195 Grain | VV N570 | 75.5 | 2787 | 79.3 | 2932 | 95% |
| 195 Grain | VV 20N29 | 85.5 | 2691 | 90.1 | 2866 | 106% |
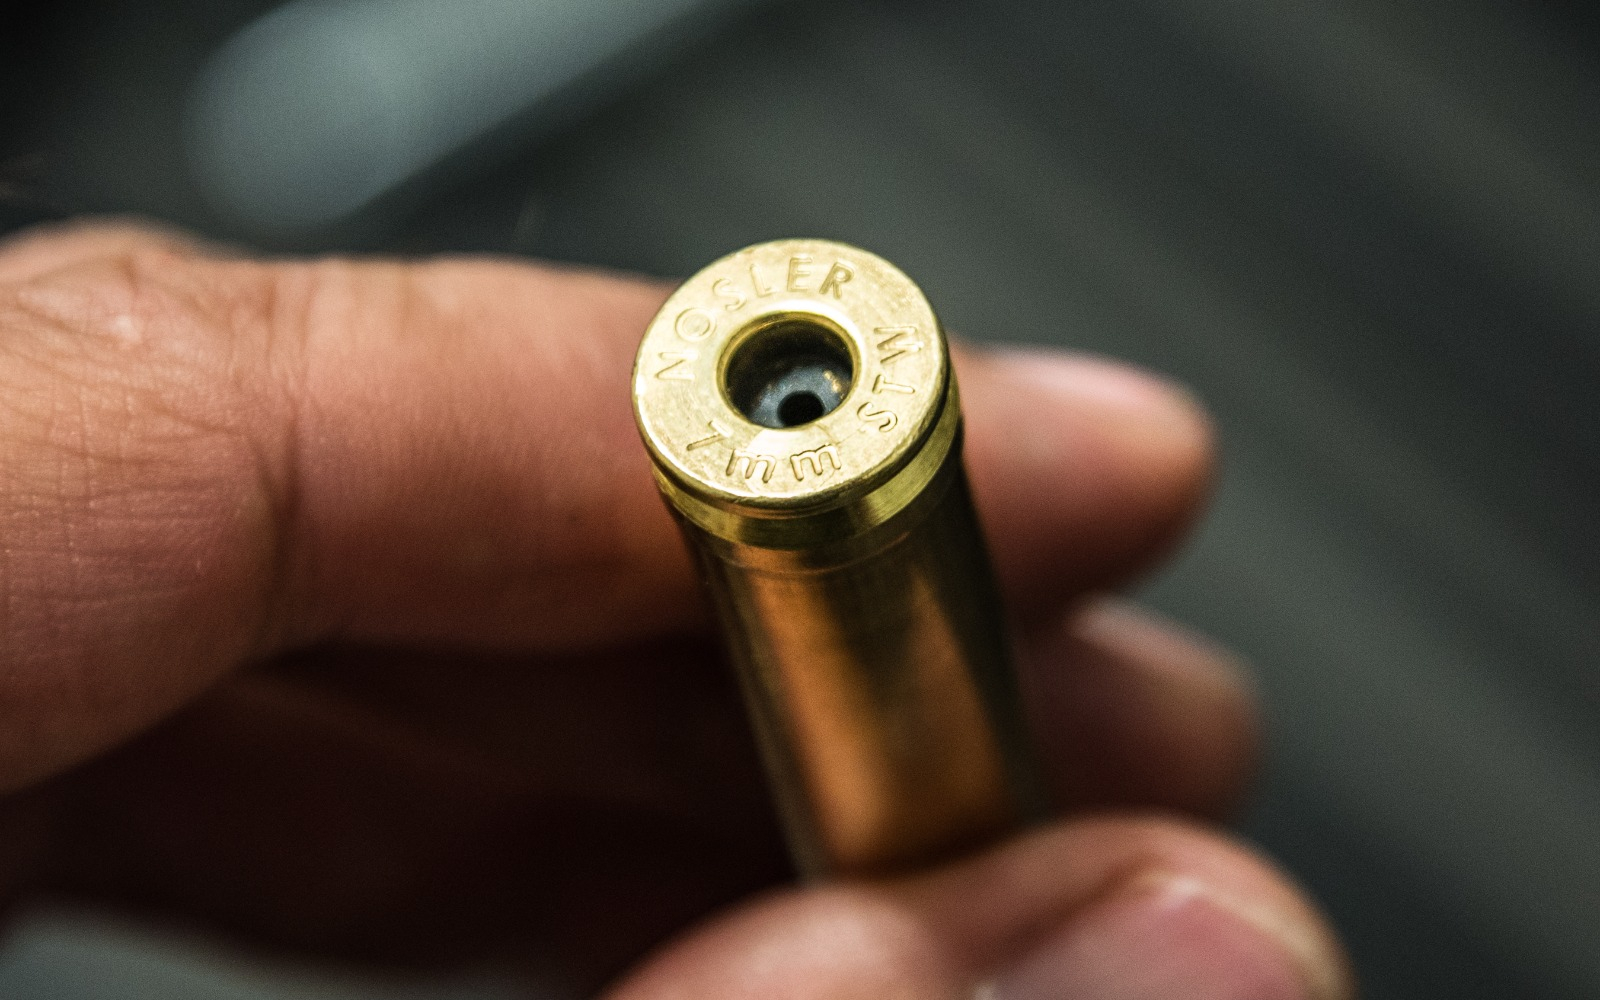
I have five of the powders listed, but I selected RL50 (Alliant Reloader 50) to try first because it’s a very slow burning powder that should work well with the heavier bullet. It has a higher case fill ratio, which can help minimize velocity spread and it also produced one of the higher velocities with my bullet. RL50 is readily available and that’s always an important factor. Many reloading books and data sources specify primers also. I’ve had good luck with Federal 215M primers in this rifle and I’ve got plenty.
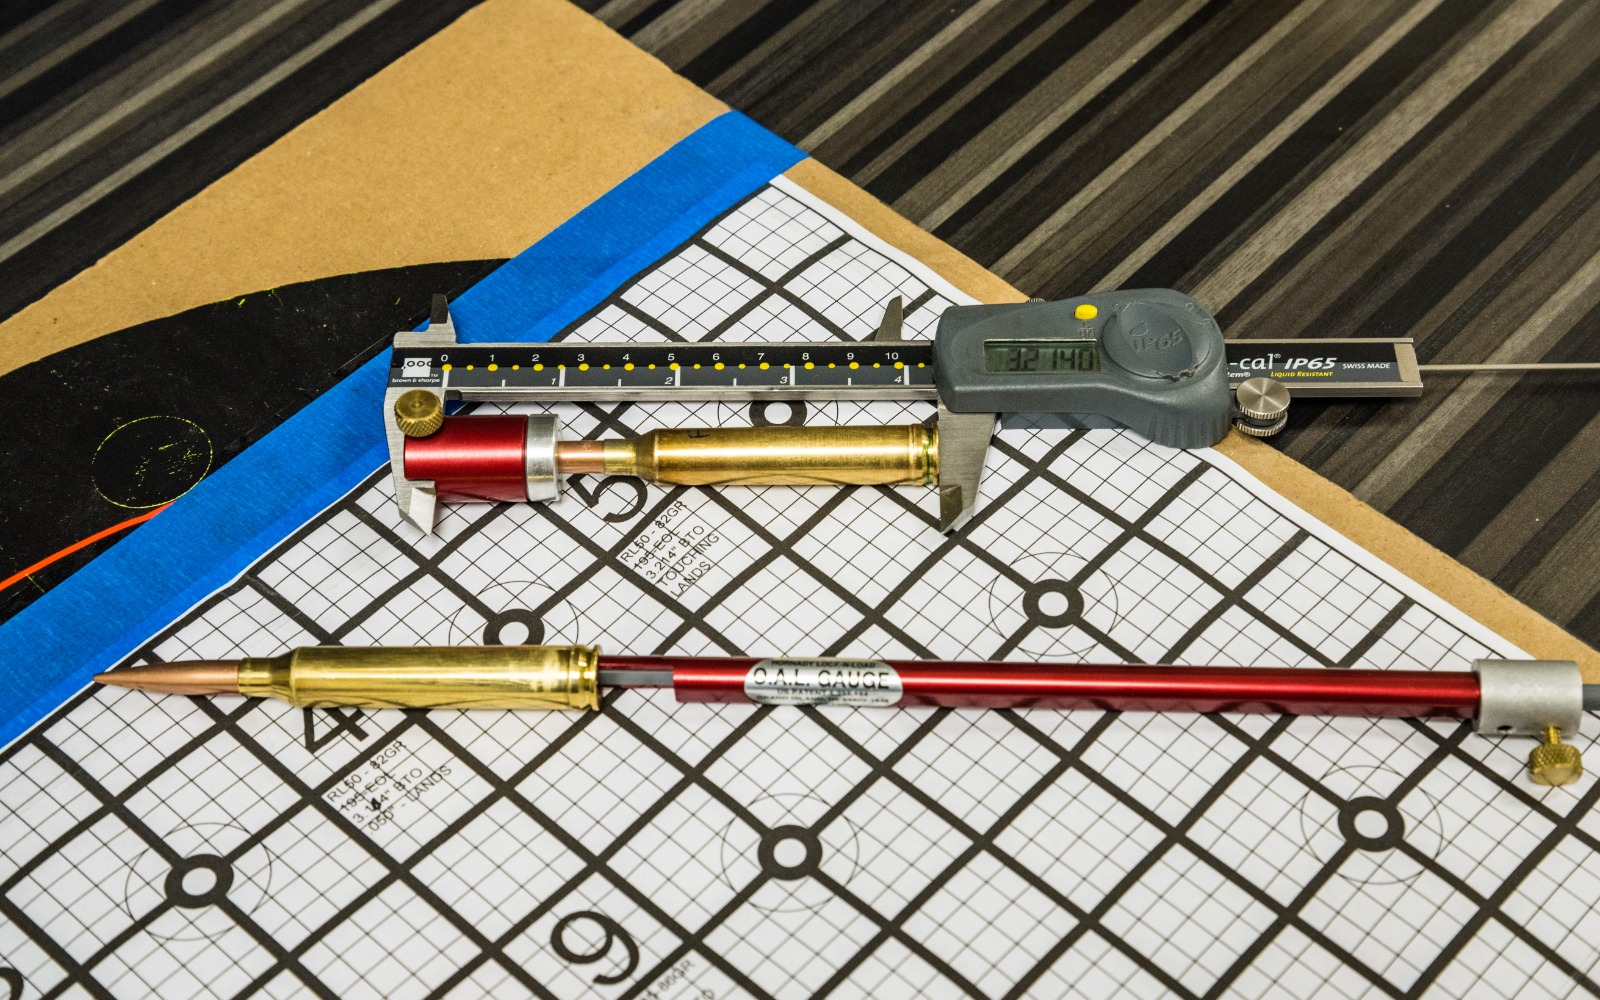
The Hornady OAL gauge and bullet comparator paired with a caliper will be some of your most valuable reloading tools.
3) Freebore
Next, I measure the distance to the start of the rifling (lands) with the new bullet using the Hornady Lock & Load OAL (overall length) gauge. This measurement is also called “freebore”.
For almost all applications, you need to seat the bullet shorter than the freebore so that it won’t jam into the rifling and get stuck if/when you extract a loaded round. You’ll need a special cartridge case matching your rifle that threads onto the gauge (sold separately). The special case has an oversized neck so your bullet can slide in and out freely when you move the plunger rod. The tool works best when used with a fired case from your rifle. Follow the instructions on the packaging to send a piece of fired brass to Hornady and they will thread your case to work with the tool for a nominal fee.
The OAL gauge takes practice to get consistent results. Use a couple of bullets and take several measurements with each bullet until you get the hang of it and are getting repeatable numbers (+/- .002”) while reloading. If you get significantly different measurements between bullets, use the longer length for your freebore to avoid potential issues.
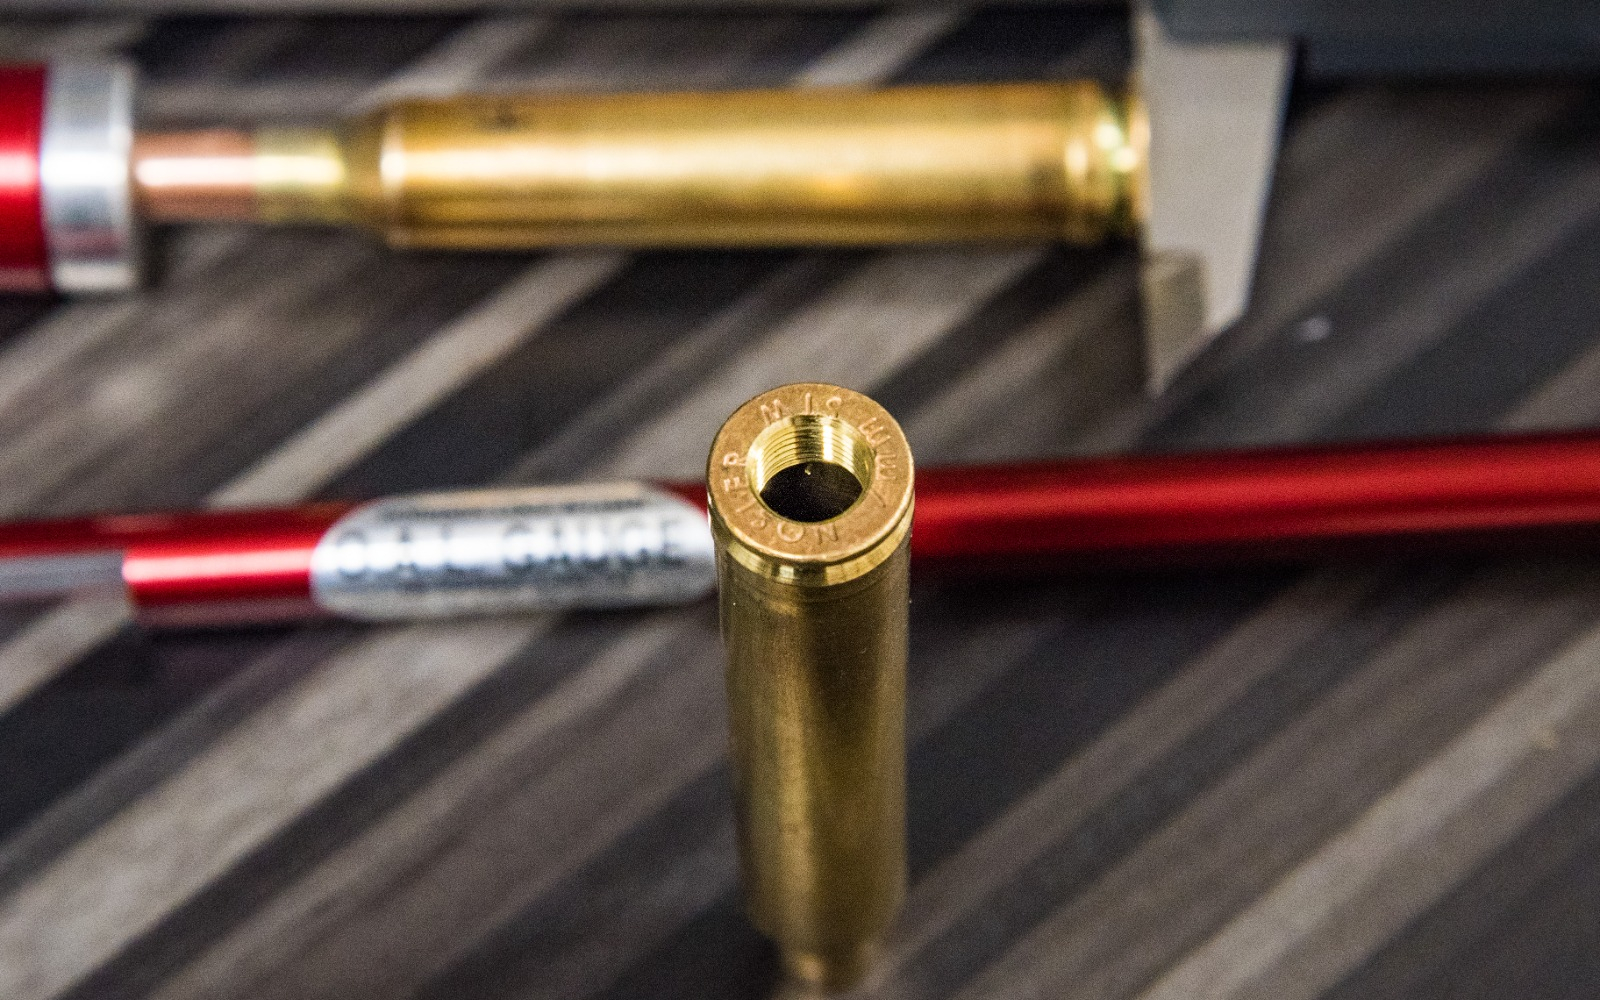
In order to actually measure the freebore on the gauge, you’ll also need a caliper with a caliber-specific bullet comparator (also sold by Hornady, among others). With the 195-grain Berger bullet, my cartridge base-to-ogive distance measured 3.214”. “Ogive” is a fancy word for the place where the curve of the bullet nose joins the main cylinder diameter of the bullet. That is also where the bullet will first engage the rifling when it is shot.
You’ll also use the bullet comparator to measure rounds off your press to set your seating die to the correct length. Many target shooters seat their bullets out long to touch the lands, and bench rest guys often jam their bullets .010 - .020” into the lands. Never seat bullets to jamming lengths as it will affect the reloading accuracy for a hunting rifle.
Send one of your fired cases and Hornady will thread it for their OAL gauge. It’s cheaper than buying the case from them and it’s custom fit to your chamber. It works better with a tight fit, too.
The cartridge base-to-ogive measurement is often abbreviated OAL, but I prefer to use BTO when referring to that measurement to avoid confusion with cartridge overall length (measured from cartridge base to the tip of the bullet) and abbreviated COAL. When checking to see if your bullets are seated to the correct length, it’s MUCH more accurate to measure BTO, because the bullet tips (meplats) are often irregular and can vary +/- .010”.
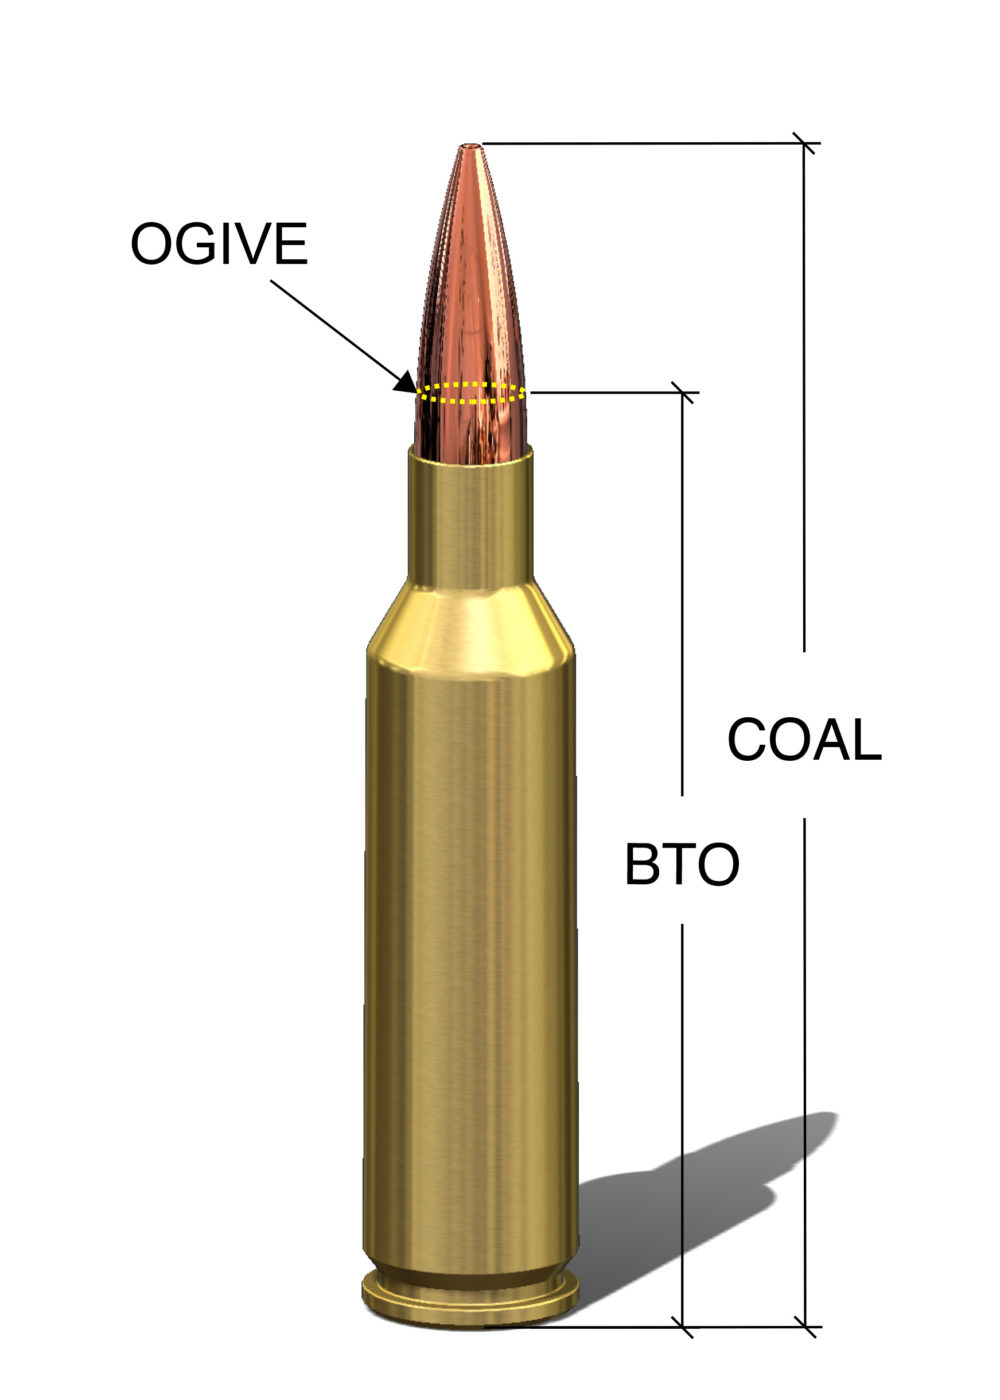 Knowing the freebore length and measuring seating depth from base to ogive (BTO) is the best way to know how far from the lands you’re seating the bullet. Freebore – desired distance to the lands (jump) = BTO that you want. Set your seating die accordingly.
4) Load Cartridges
Now that the freebore is defined, you can safely load the cartridges at various seating depths to determine the most accurate BTO. *CAUTION*: Many rifles have magazines that are too short to allow seating bullets near the lands. Measure the internal dimension of your magazine before reloading!
If your magazine is shorter than your freebore measurement, start with a seating depth about .010” shorter than your magazine and progress shorter in .030” increments. The best reloading accuracy is usually found near mag length on these rifles.
An extended magazine can be installed by a gunsmith in many rifles such as the Remington 700, so if you want to test single feed to test longer seating depth, there is a way to extend these magazines out to 4” for a long action instead of the factory 3.7” mag box. Wyatts makes extended boxes that I’ve used on my own rifles.
Berger’s website states that there is usually a “sweet spot” that is .030-.040” wide in seating depth, usually located between the lands and .150” jump off the lands. Therefore, testing seating depth in increments of .040” should allow you to find a length that shoots well.
Berger recommends groups of test loads at increments of .010”, .050”, .090”, and .130” off the lands. Berger recommends six of each, but I’ve found 3-shot groups usually will tell the story. These increments have worked reliably on several of my rifles to find a good seating depth.
If you’re not satisfied after the first test, use finer increments around the best depth from your first pass or split the difference and try .030”, .070”, .110”, and .150”. Some rifles are more finicky than others in this regard, but with only 24 rounds down the tube, there’s a good chance you’ll hit paydirt.

Micro-adjustable seating dies like the Redding Competition Seating Die vastly improve the reloading accuracy and speed of seating depth adjustments.
Use the lowest listed powder charge for your bullet/powder combo when testing seating depth, because pressures can spike when approaching or touching the lands. If touching the lands turns out to be best, then you can work up a powder charge slowly to determine your max load. Conversely, if you were to work up a hot powder charge that shot well .100” off the lands, you could be dangerously over pressure if you later move the bullet out to touch the lands.
5) Prepare Loads in Steps
Using the best seating depth identified in Step 4, prepare three loads in 1% powder steps between starting and the max listed loads. The table Berger provided lists a starting load for RL50 powder of 82 grains and a max load of 86.4 grains. Using 1% (0.8 grain) increments, we get loads of 82, 82.8, 83.6, 84.4, 85.2, and 86 grains.
Most rifles will need two or three shots to return to their zero after the bore has been thoroughly cleaned, so prepare 6 - 8 extra fouling rounds at the starting load for sighters and to season the tube with a little copper before starting the test. Any extra fouling rounds can be used for your next test session or to season the barrel again if the rifle needs cleaning during the test.
6) Ladders
After the fouling rounds, shoot one shot from each charge weight in ascending order at one target, with the same point of aim at 100 yards. Have a buddy watch the impacts and record the position of each shot at the bench on a duplicate target, labeling every hole with its powder charge. You should also be shooting through a chronograph and recording each velocity (highly recommended).
As you work up in charge weight, watch for pressure signs, and stop at the first hint that your load is too hot. Typical pressure signs are slightly harder bolt lift, flattened or cratered primers, a shiny ejector mark on the bottom of the case, excessive recoil, or a sudden jump in velocity above the typical increment for that powder step. Don’t shoot any higher loads after you see pressure signs!
Put an X on the bottom of all equal and higher loads. Exclude them from the test and disassemble them when you get home.
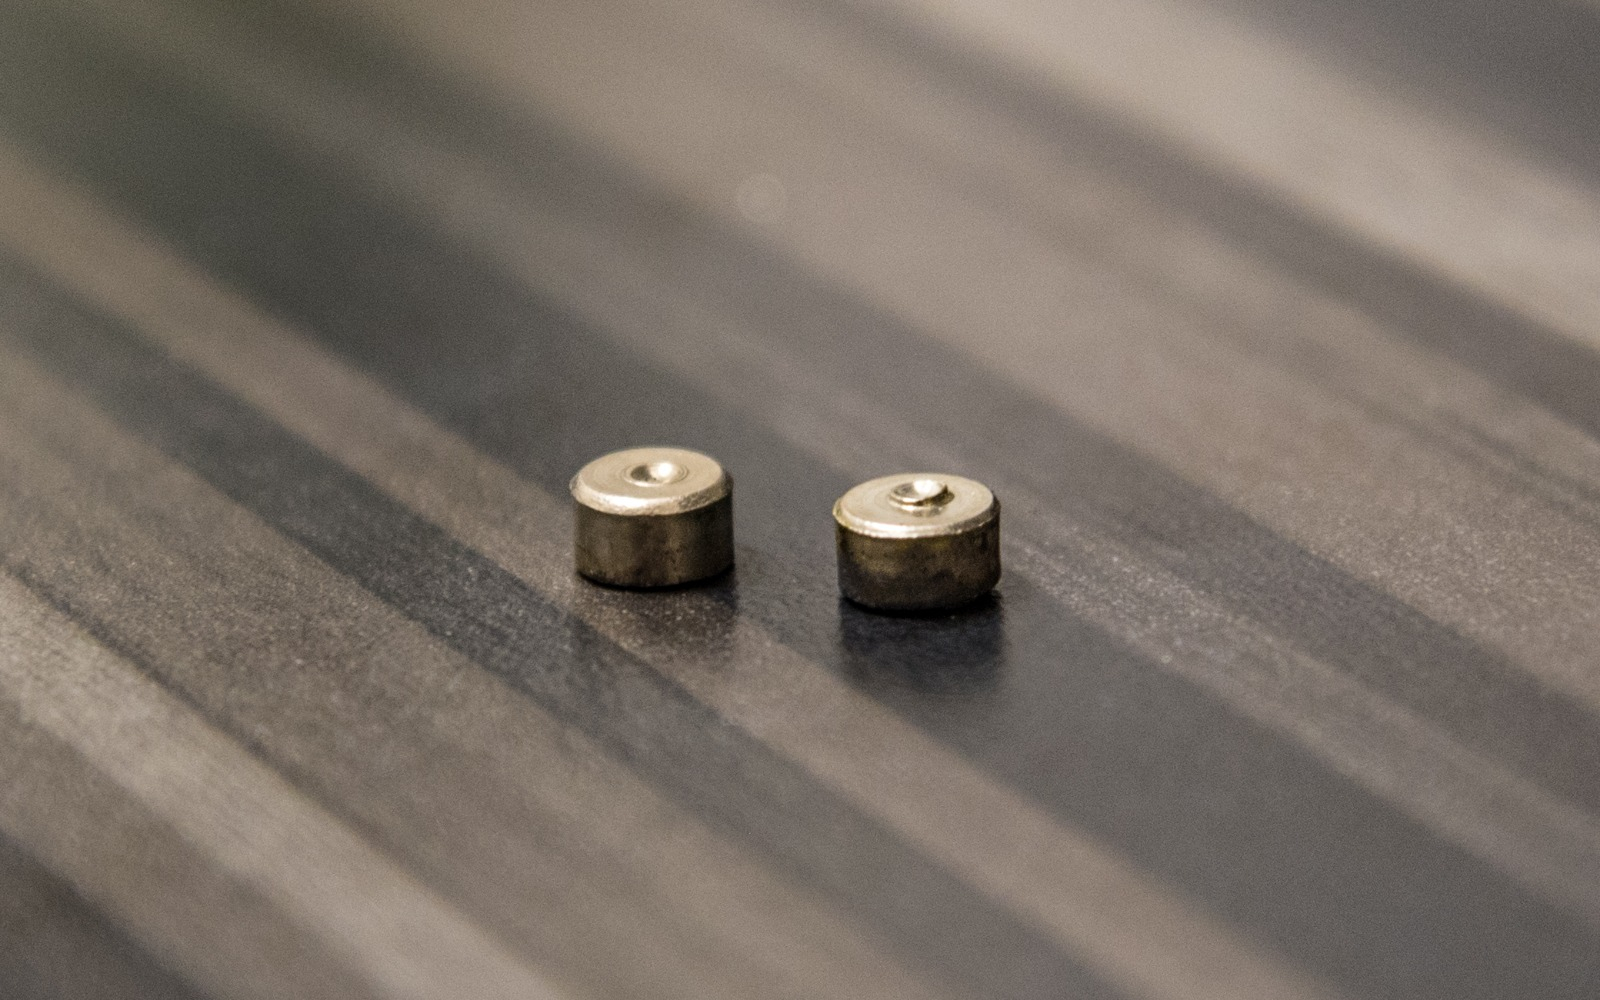
Pressure signs can be hard to spot in bright sunlight. I missed the faint ejector mark on the load prior to this shot before it was obviously too hot. A shiny, raised ejector mark is a sign you are way over pressure. Primers are another reliable pressure gauge. Notice how the primer on the right is cratered and also has sharper corners compared to the radius on the left primer.
After you complete the first ladder, repeat the process with the next two strings, using a clean target for each. If you don’t have a spotter, you can color code bullets with a sharpie marker on the portion of the bullet in front of the ogive so the color won’t touch the bore. On a white target, you’ll easily be able to pick up the color of each shot – just be sure to write down the colors you used for each powder group. If you make a bad shot, note that in your log so that an errant data point doesn’t cloud your judgment. That is the main purpose of shooting three separate ladders.
If you have a factory barrel, you may need to clean the rifle between the 2nd and 3rd ladders to ensure that fouling isn’t hampering accuracy. Most hand-lapped custom barrels will be able to shoot 20-30+ rounds with little or no change in accuracy due to fouling. Shoot a couple of fouling shots after cleaning, then resume with the final ladder.
Leave ample time between shots to allow barrel heat to dissipate. Test results will get skewed if the barrel is hotter and hotter after each shot. Heavier, contoured barrels are typically less affected by heat, but barrel temp is still worth monitoring to ensure that you get the most consistent groups possible. Using your phone to time shots can help with consistency.
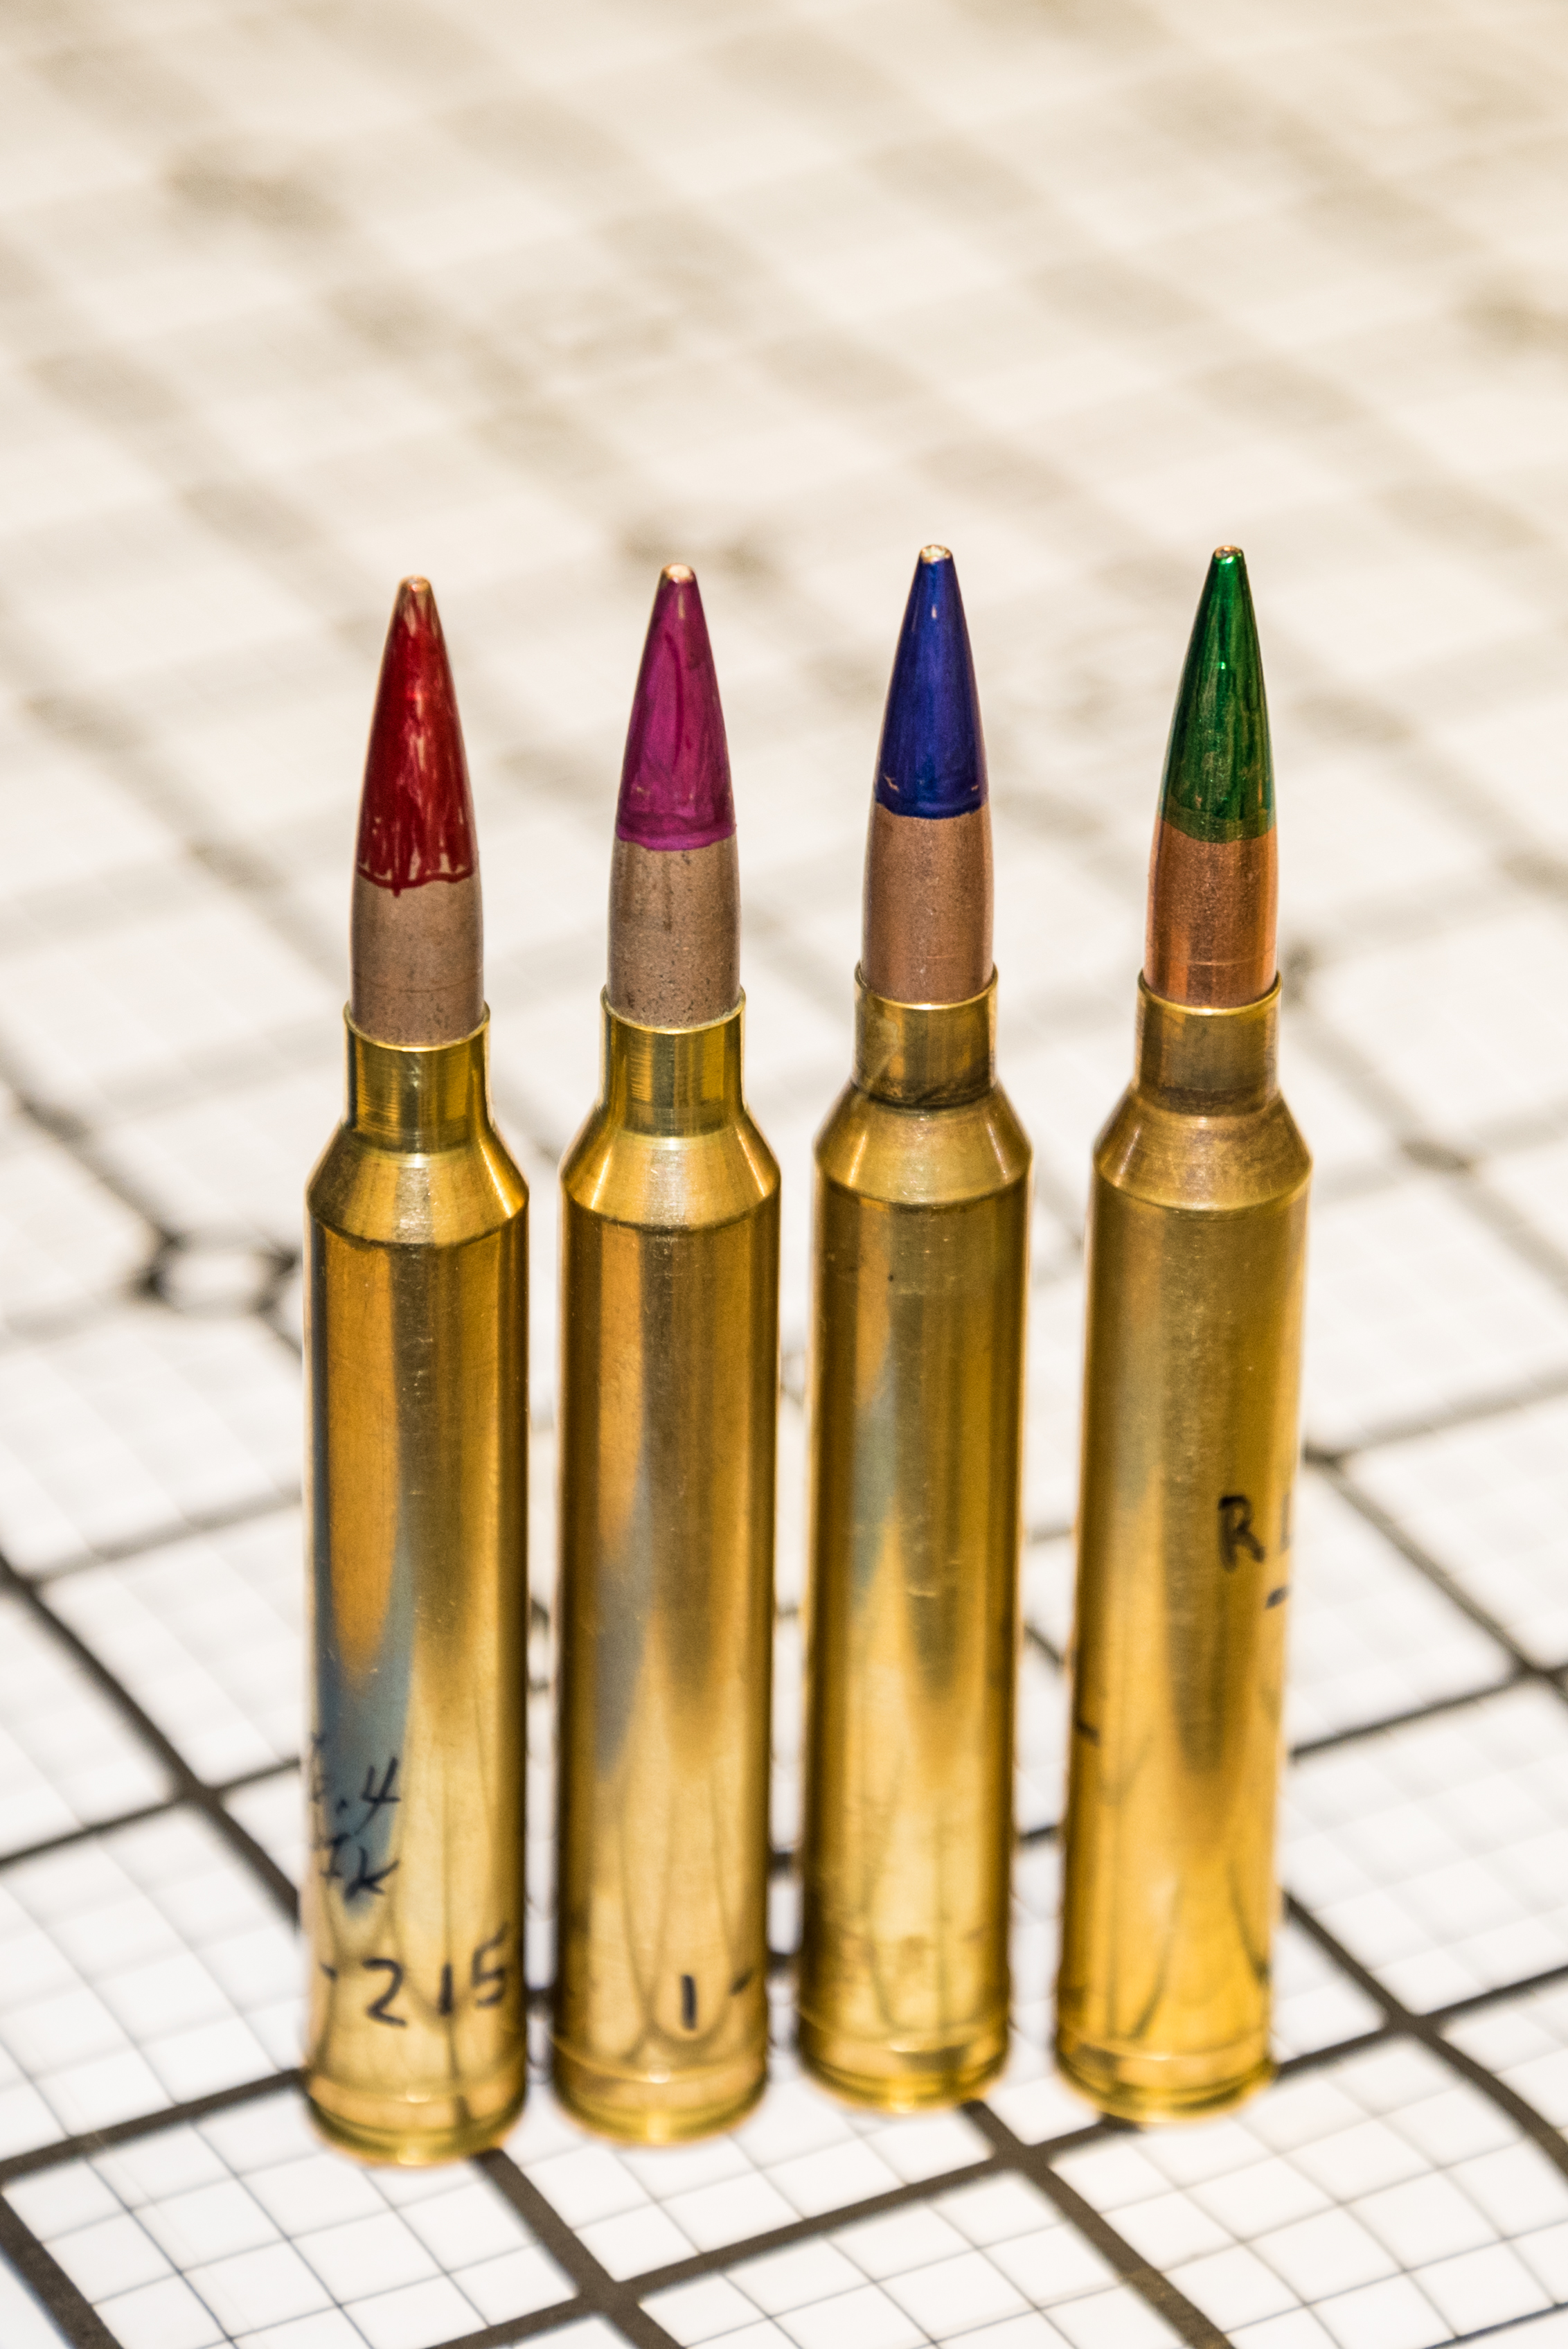
Color bullets in front of the ogive with a colored Sharpie if you don’t have a spotter, so that you’ll be able to identify which load hit where on a white target background. If you have a mystery bullet that hits a black part of the target, rubbing alcohol on a Q-Tip will reveal its true color.
7) Reloading Analysis and Selection
Reading your results and selecting the best load is the final step in the process. Sometimes the results are obvious, but often the subtle details need to be explored in depth to make the best choice.
The first indicator that you’ve found reloading accuracy node is when three consecutive load steps group together. If you see that on all three ladders, the obvious choice is the middle load. The fact that it grouped with charges above and below it indicates that it won’t be overly sensitive to powder and pressure variations.
If the velocity spread was under 10 fps for that load, then you’re almost guaranteed to have a winner. Target rifles often print data like that, but in my experience, hunting rifles often leave us scratching our heads a little more. That’s when you’ll need to dig a little deeper.
In my article How to better load test and evaluate, I’ll show you how to log and chart your ladder data to better illustrate where your reloading accuracy nodes are. We’ll look at all the data collected from my rifle and discuss how using a chronograph can help you choose between loads when the answer isn’t obvious. In the meantime, get those components rounded up, plan your load tests, and shoot straight!