NOTICE: Certain links on this post may earn a commission for Western Hunter Magazine from Amazon or our other affiliate partners when you make a purchase. Thank you for your support.
12 Tips for Compound Bow Setup
During my annual late-season archery hunt in Montana, a good friend of mine missed a “slam dunk” shot at a fantastic buck. He was incredibly upset, but also certain there had to be a problem with his bow. We set out for camp to see if we could correct the problem. We quickly confirmed his arrows were hitting high of their mark, but his inability to shoot a tight group was also concerning. It was possible that there was an issue with his compound bow setup.
I went to work trying to diagnose the cause but couldn’t identify anything obvious. I checked all the basics and then adjusted the bow sight to correct the elevation problem. My friend’s elbow was hurting from an old injury, so I offered to check the other sight marks. I drew and shot the bow once, and it was obvious that much of his struggle was due to poor compound bow setup. I was able to get the bow sighted in, but it was a battle to group arrows consistently, even though his bow fits me reasonably well.
There are a few basic goals you should have in mind when setting up your bow. First and foremost, you need to make sure the bow fits you, it’s well-tuned, and sighted in properly.
After that, you need to take the necessary steps to ensure the bow maintains its tune and stays 100% consistent. Your compound bow setup needs to be durable and repeatable.
Next, choose the right accessories and refine your compound bow setup to eliminate some common pitfalls that make any bow more difficult to shoot.
Finally, if something does change, you need to be able to identify the problem, so you can make a quick fix or even spot the problem before it shows up downrange when hunting.
Here are a dozen tips to help you set your bow up and shoot like a pro.
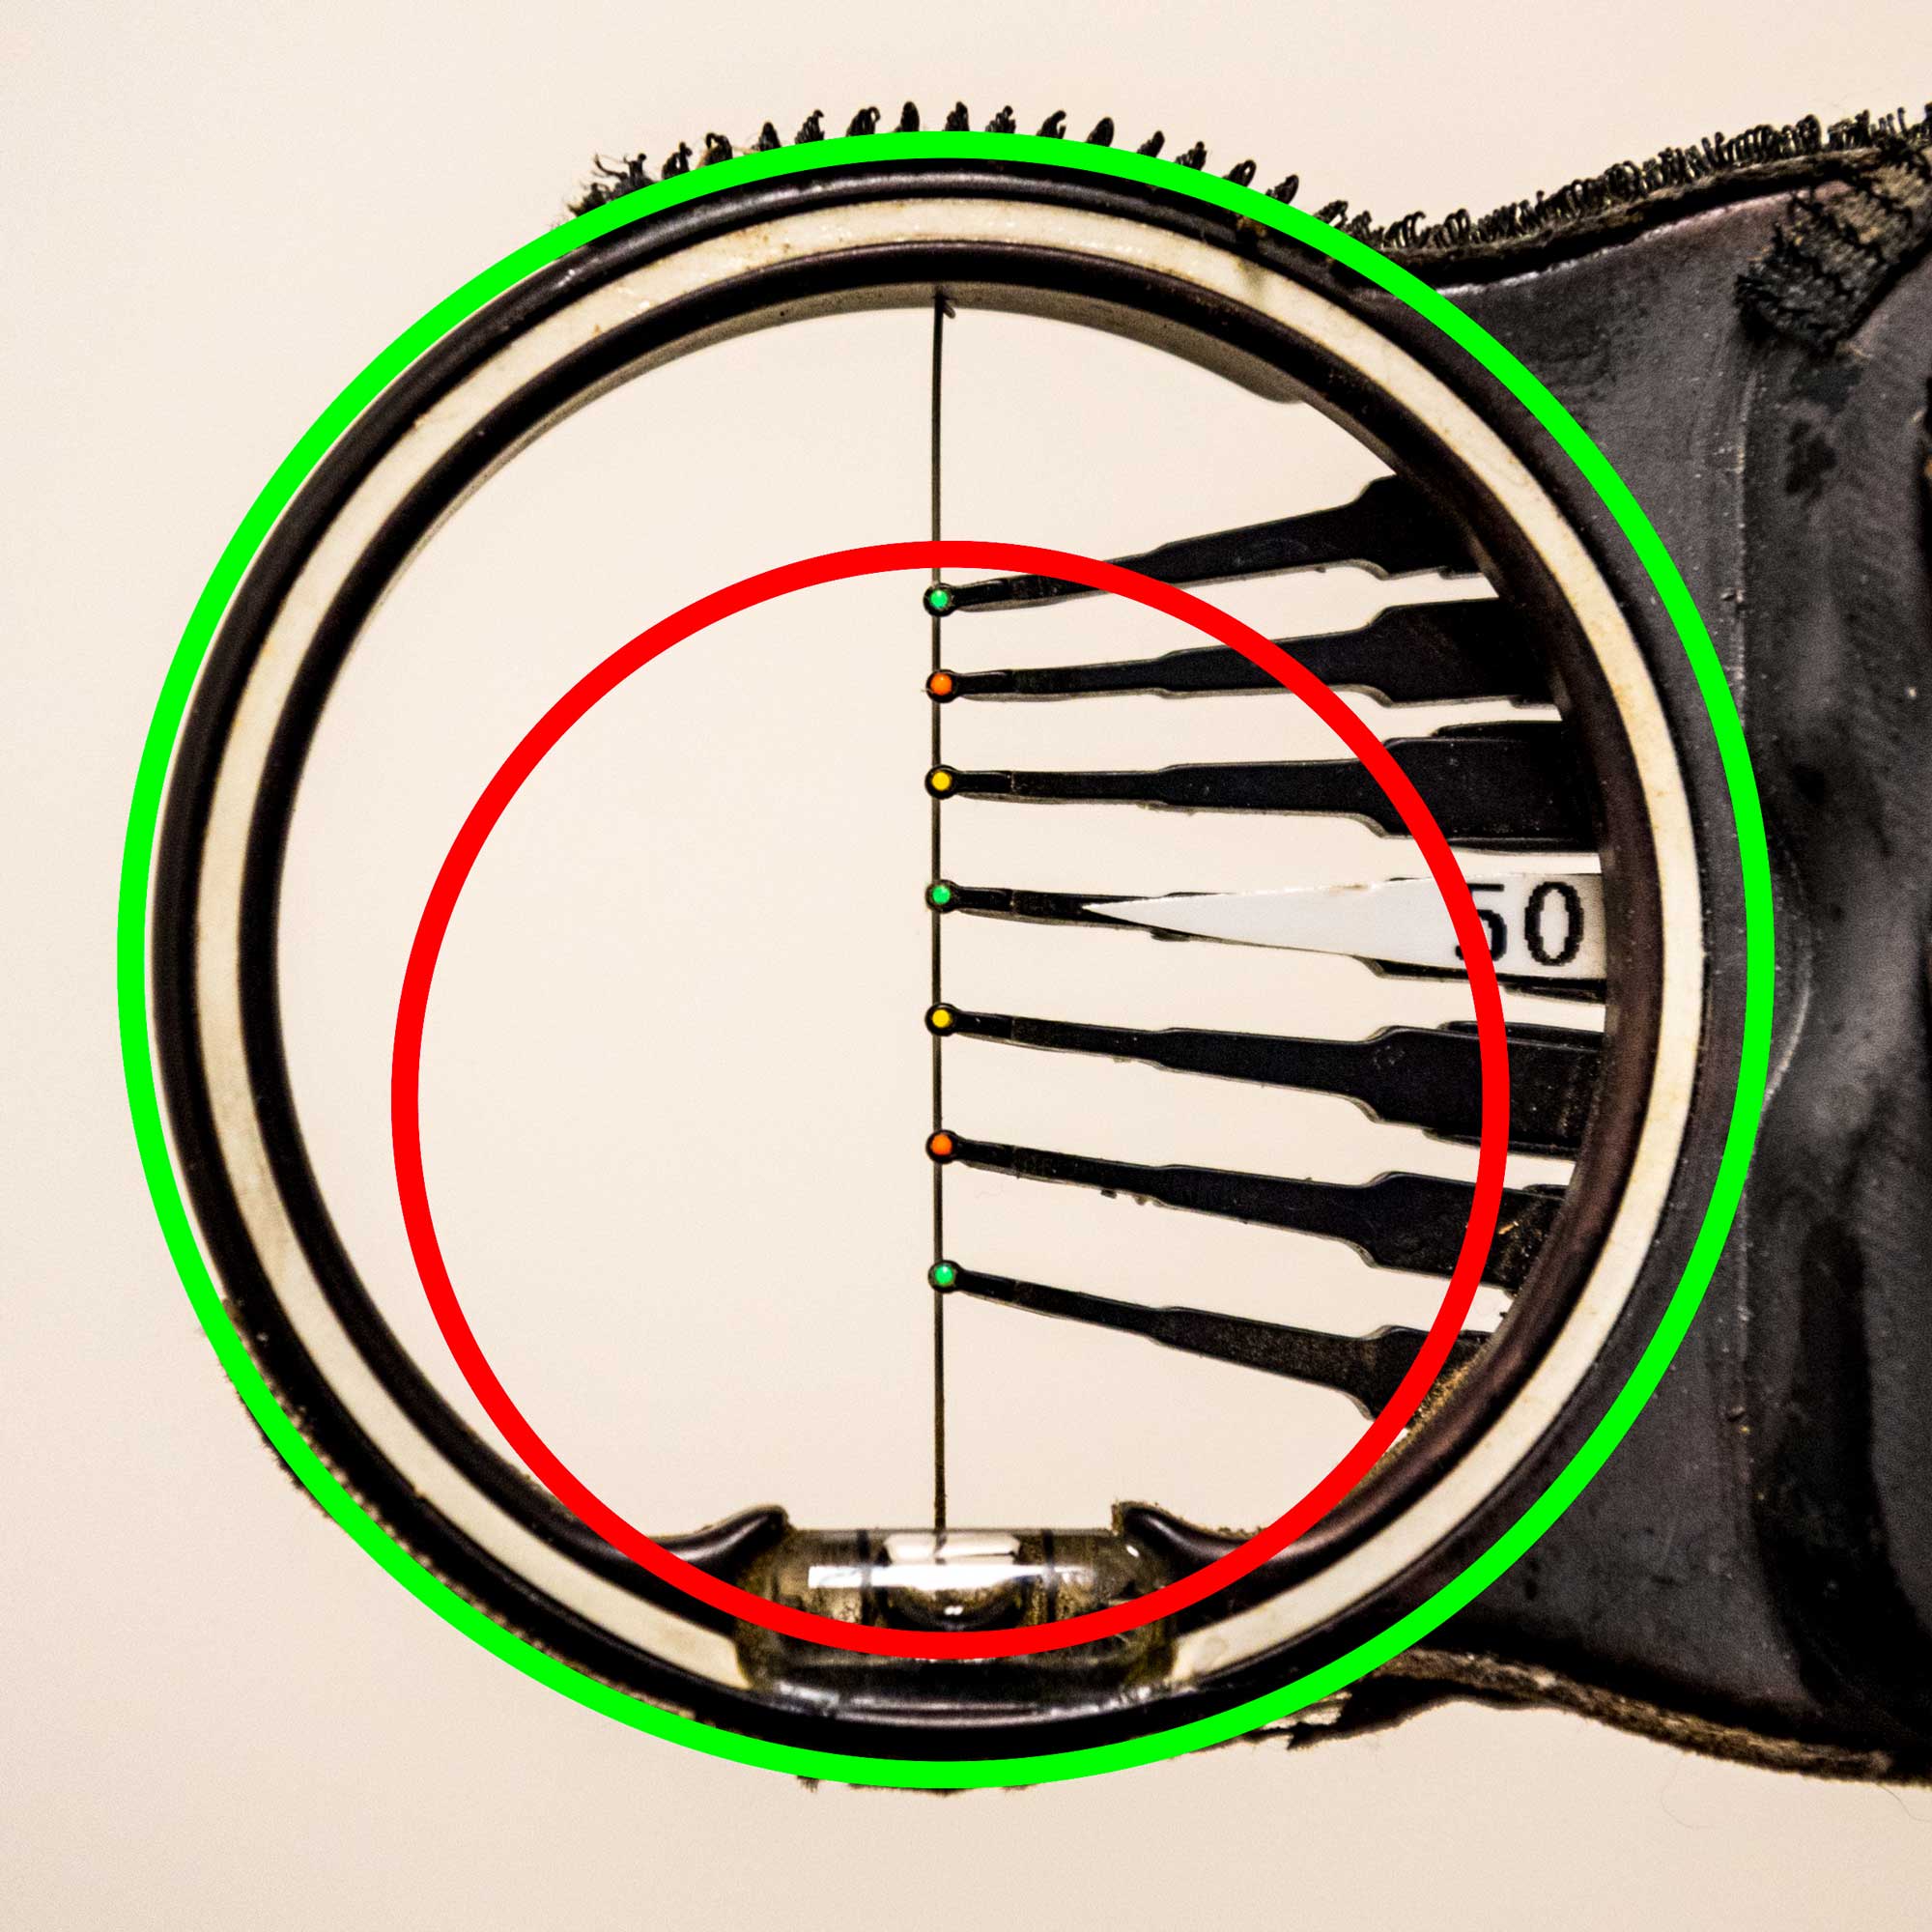
Shoot a Properly Sized Peep Sight: The view through your peep should be at least as wide as the green circle for optimum consistency. If your view is more like the red circle, you’ll struggle to align the peep consistently, especially when lighting conditions vary.
1. Shoot a Properly Sized Peep Sight
You should use a peep with an aperture (hole) that is large enough to allow you to see and center the entire sight housing inside the peep in sunny conditions. In my friend’s case, he could see all his pins, but couldn’t see the round sight housing or his level, so it was difficult to consistently center the peep and maintain level during the shot.
A larger peep is also a big advantage in low light conditions when game is more active, and you’re likely to get most of your shots. Most bow sights feature round housings because they are naturally easier to center in the round aperture of the peep sight. If you’re using a sight with an odd-shaped housing, it may be time to round up a new one. Check your peep aperture size in sunny, outdoor conditions, because the peep will appear smallest when it’s bright due to the way your pupils constrict in bright light.
2. Tie in the Peep Sight Properly
If you’re a subscriber, you likely read the how-to article I wrote on this very subject in the last issue. Believe it or not, one of my own friends showed up to hunting camp with knots above and below his peep. Since the peep wasn’t locked into the string, there’s a good chance it moved and caused him to miss that great buck with matching cheaters on each side. Buy your hunting buddies a gift subscription to Western Hunter to make sure they don’t make the same mistake!

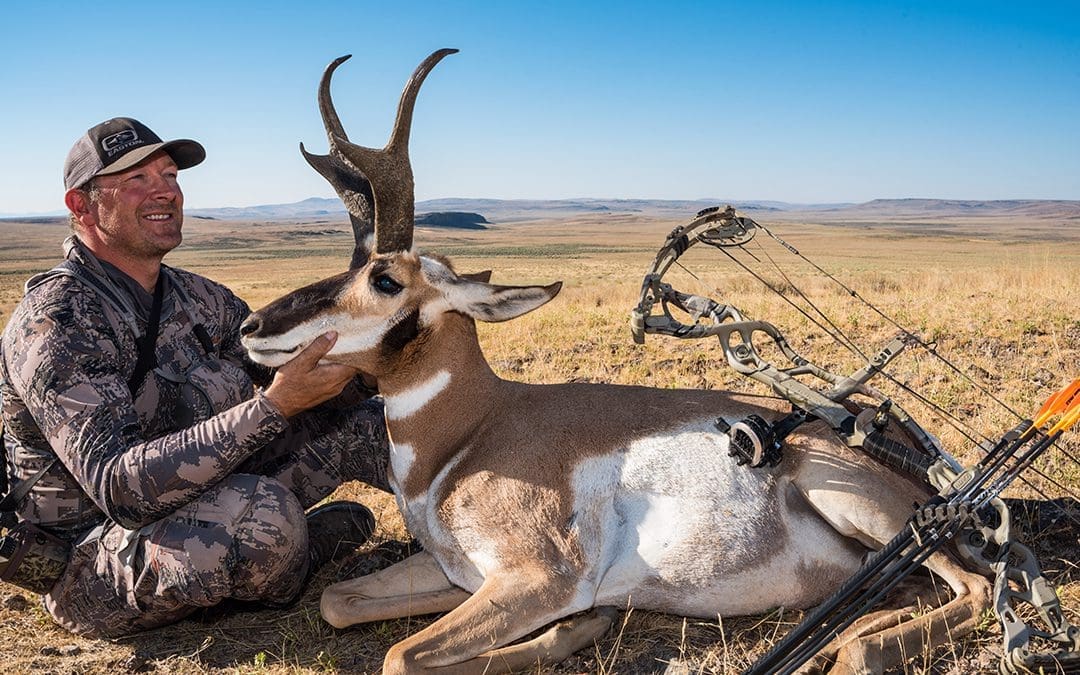
Balance the Bow: I ambushed this antelope buck on a steep hillside between two springs. A well-balanced bow and a sight level in full view through my peep helped me make the difficult shot.
3. Balance the Bow
My friend’s bow was much harder to keep level because his quiver upset the balance. To level the bow, I had to muscle the grip counter-clockwise. In doing so, I made several mediocre shots due to the torque I was applying and the extra time it took to level the bow. When you only have 7-10 seconds to shoot your best shot, it’s silly to waste half your time and energy fighting gravity while getting the bow to a level position.
I personally use the Quivalizer by Option Archery. The Quivalizer combines the function of the stabilizer and quiver. The unique mounting setup dramatically improves the bow’s balance and reduces the total mass weight of the bow’s accessories. The longer stabilizer effect of the Quivalizer also makes your hunting bow aim more like a target bow. An offset stabilizer or sidekick rod can also be used to balance the bow, but you’ll be adding a fair amount of weight by comparison. I recommend the Quivalizer as one of the few accessories that will definitely help you shoot more consistently.
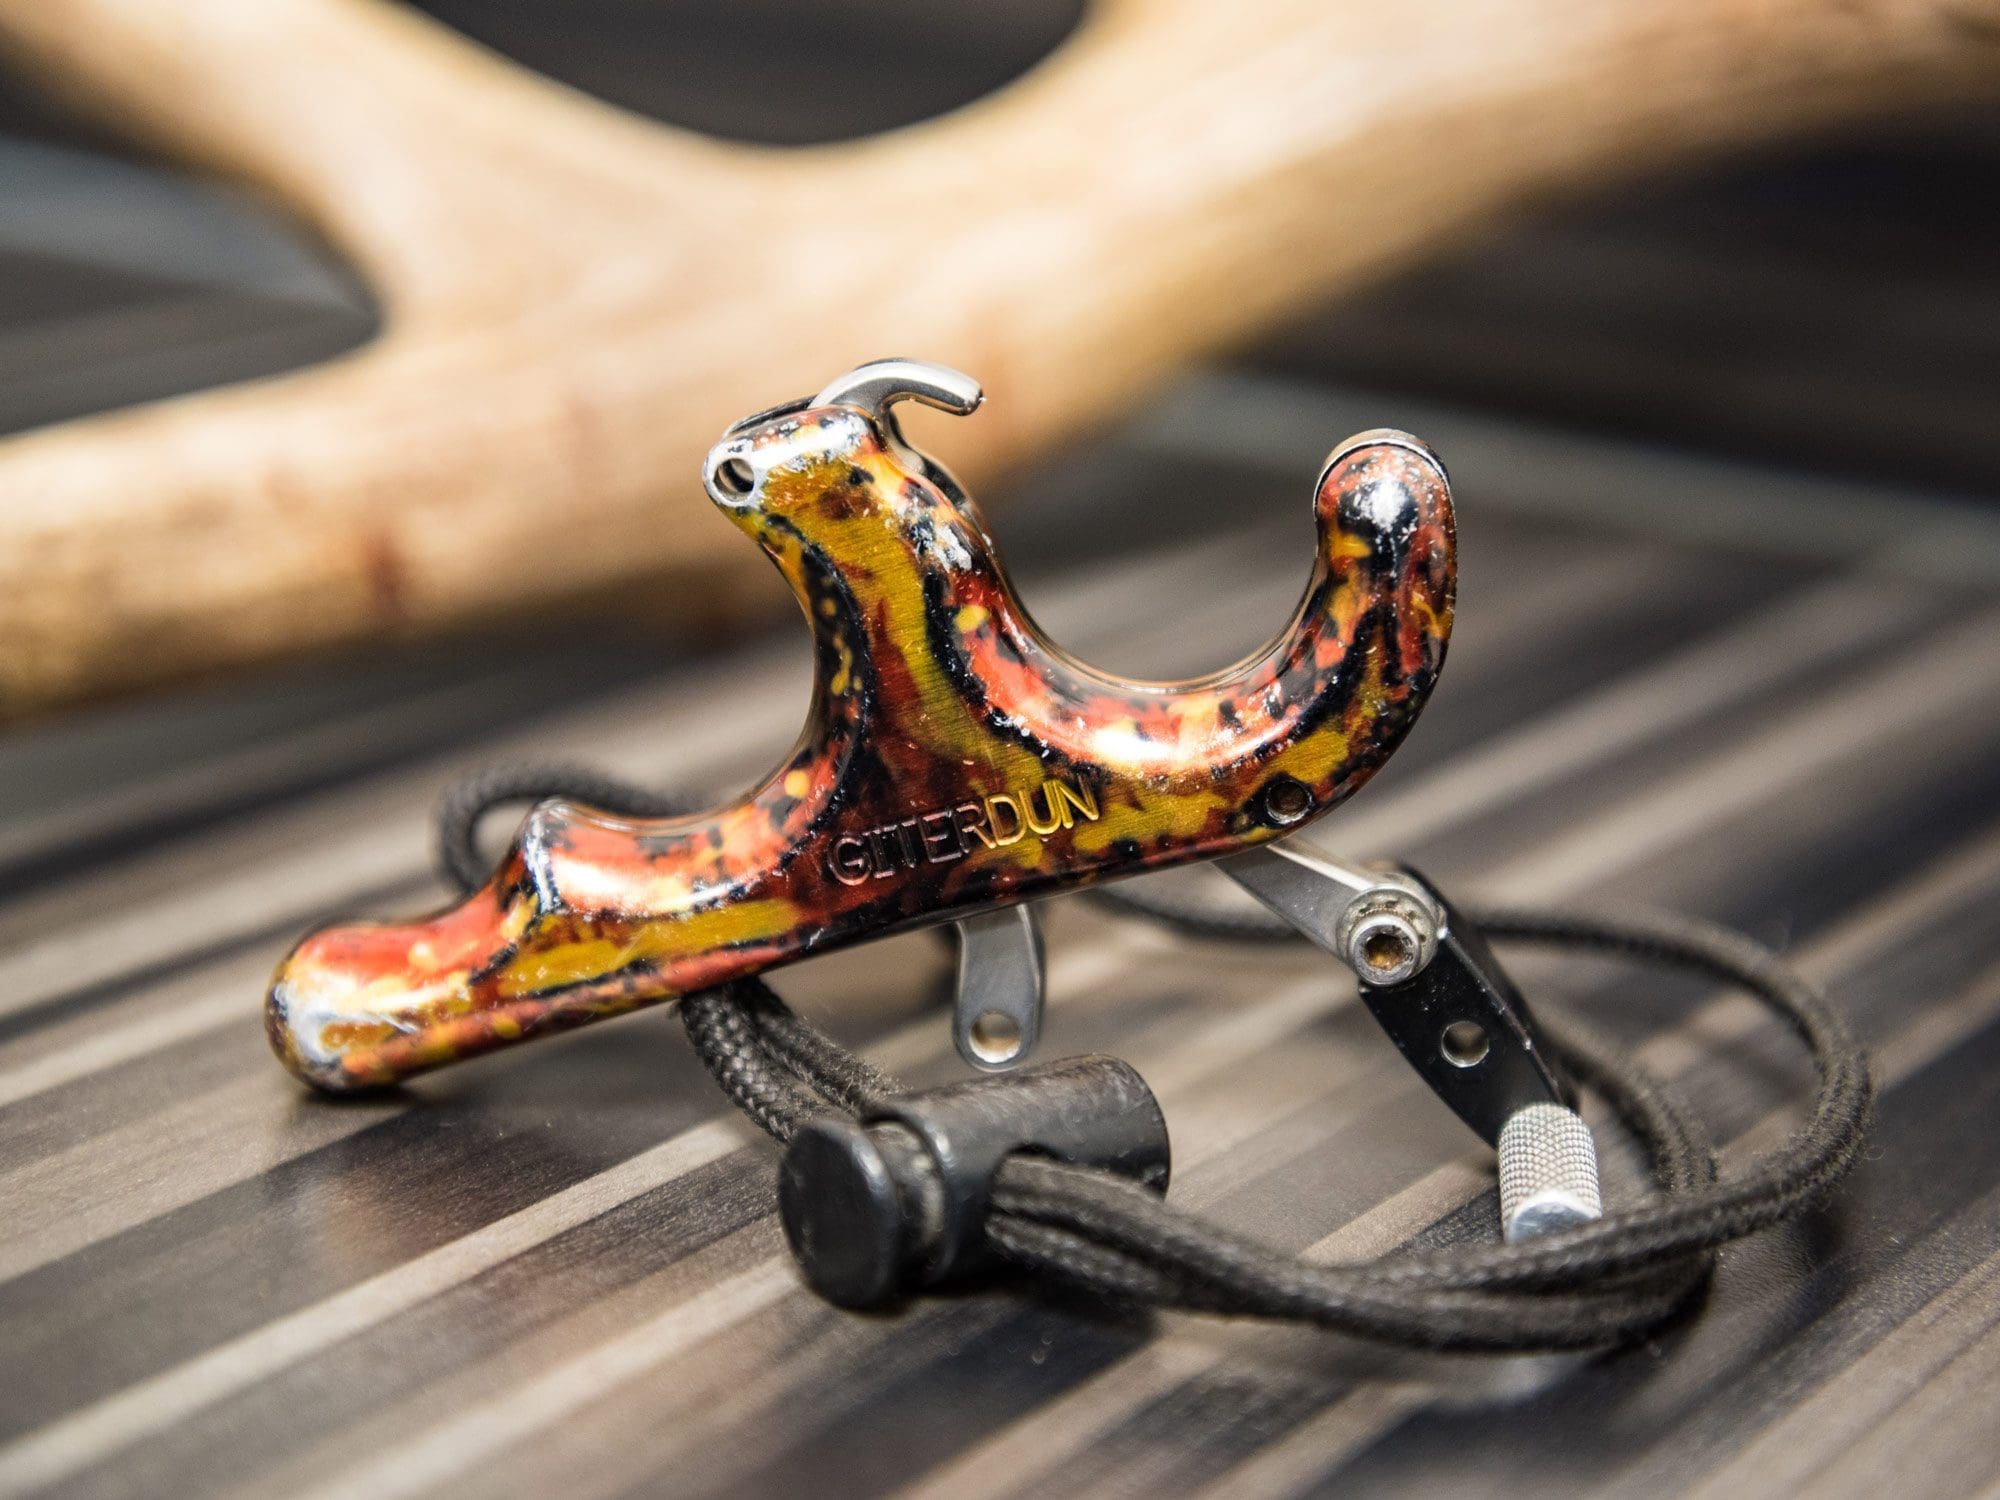
Shoot a Quality Handheld Release Aid: You can probably tell from scuff marks that I’ve used the same Carter release for at least a dozen years. It has all the best features a hunting release needs: Lanyard, short head for more draw length, excellent adjustable trigger, open jaw for quick loading, and durable parts in a proven, reliable design. This model is discontinued, but Carter’s Ember and Too Simple models are similar.
4. Shoot a Quality Handheld Release Aid
Most handheld releases have excellent, double-sear triggers that are highly adjustable. They can typically be set to virtually zero creep before they fire, and the trigger tension can be set from heavy to extremely light.
My buddy was shooting a popular wrist-strap, index finger release and I noticed he was experiencing a bit of target panic and punching the trigger from time to time. When I took that first shot, I noticed the trigger had some creep and lots of over-travel compared to the handheld Carter releases I use. The long head of the release also cost him some draw length compared to a handheld.
Getting an extra ½” or 1” of draw length can add 4-10 feet per second depending on the bow you’re using. If you decide to try a handheld release, make sure you get something that incorporates a lanyard. Keeping the release attached to your wrist ensures it’s ready when a sudden opportunity arises, and most importantly, prevents losing a $200 item that will also end your hunt.
There are some quality wrist strap releases with good triggers, but I’ve personally found that target panic and punching the trigger are far more difficult to avoid with an index finger release. I’ve seen a trigger swap on a rifle reduce groups from 1” plus down to nearly a half-inch off a shooting bet. I suspect the effect is even greater for a bowhunter.
5. Use a Multi-Pin Bow Sight
Bowhunting is not a marked distance target shoot. I can’t tell you how many times I’ve watched guys screw up trying to shoot a single-pin slider for hunting in the West. Of course, you can shoot it more accurately when you’re practicing in the backyard. Just convince the deer and elk to stay put and only stand at the range your sight is set to and you’ll be fine.
Seriously, get a full rack of pins. If your single pin slider hasn’t cost you an animal yet, you either hunt very cooperative animals or you haven’t been using it very long.
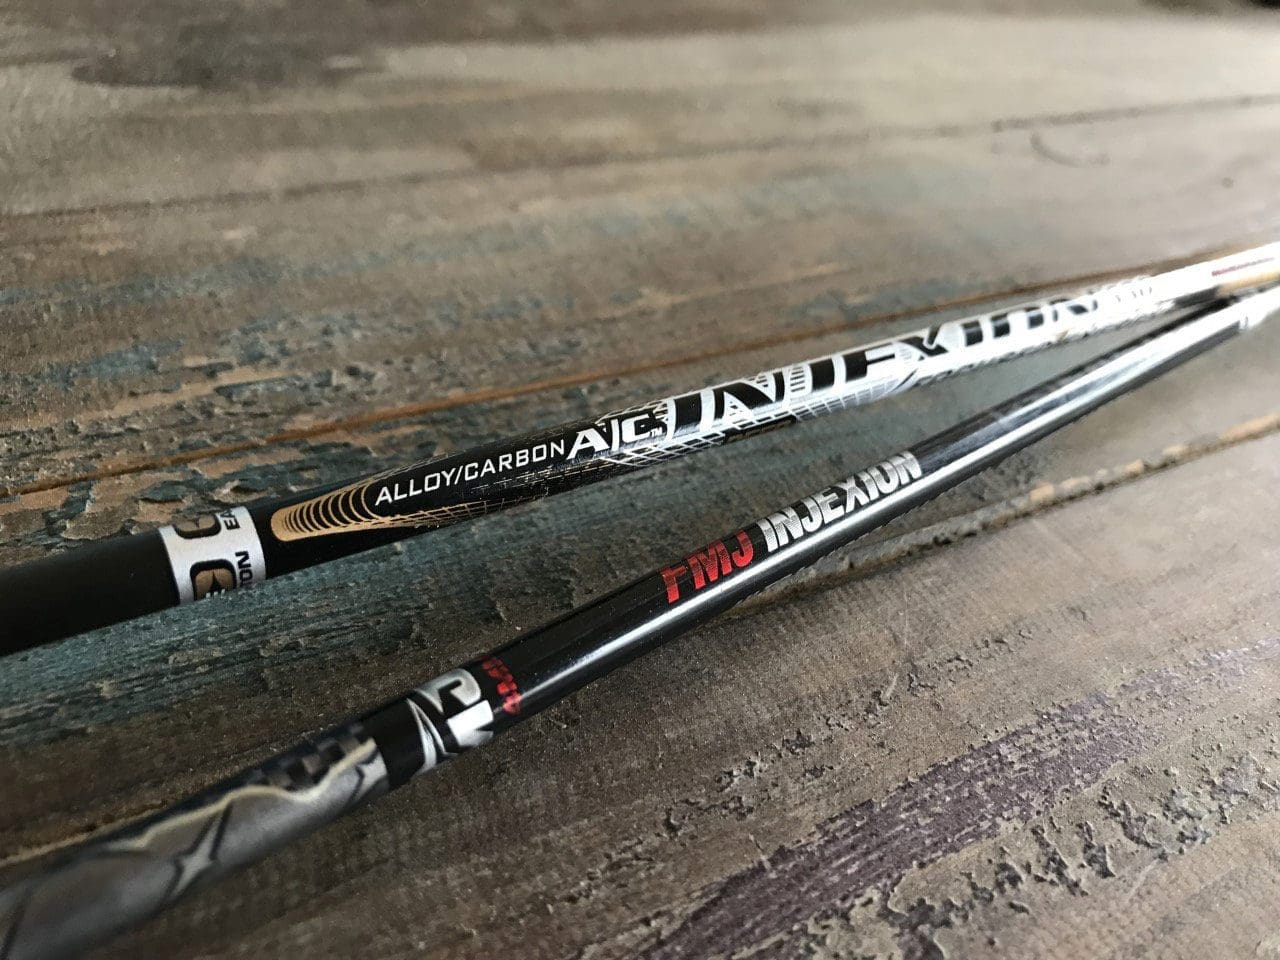
Easton A/C and FMJ Injexion 4mm are two of my favorite micro-diameter shafts. Both feature dense, composite aluminum-carbon construction for superb spine and straightness consistency.
6. Shoot Small Diameter Shafts
Most arrow companies offer smaller diameter hunting shafts. They penetrate better and drift less in the wind. When using a drop-away style rests, there is really no drawback to using them. Next time you’re due for new arrows, go skinny. It’s one of the easiest performance gains you can buy. Victory Archery insert/outserts can be used in several popular small diameter shafts to allow the use of standard 8-32 thread broadheads if that’s a sticking point for you.
Victory Archery insert/outserts can be used in several popular small-diameter shafts to allow the use of standard 8-32 threaded broadheads. I use them to avoid the need for a special broadhead thread with small diameter arrows.
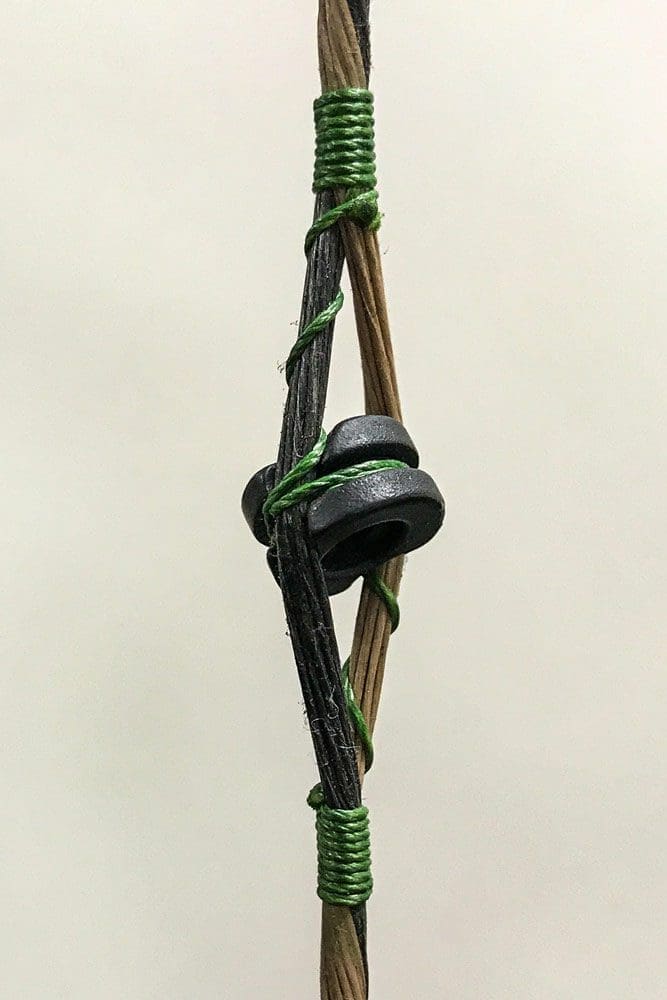
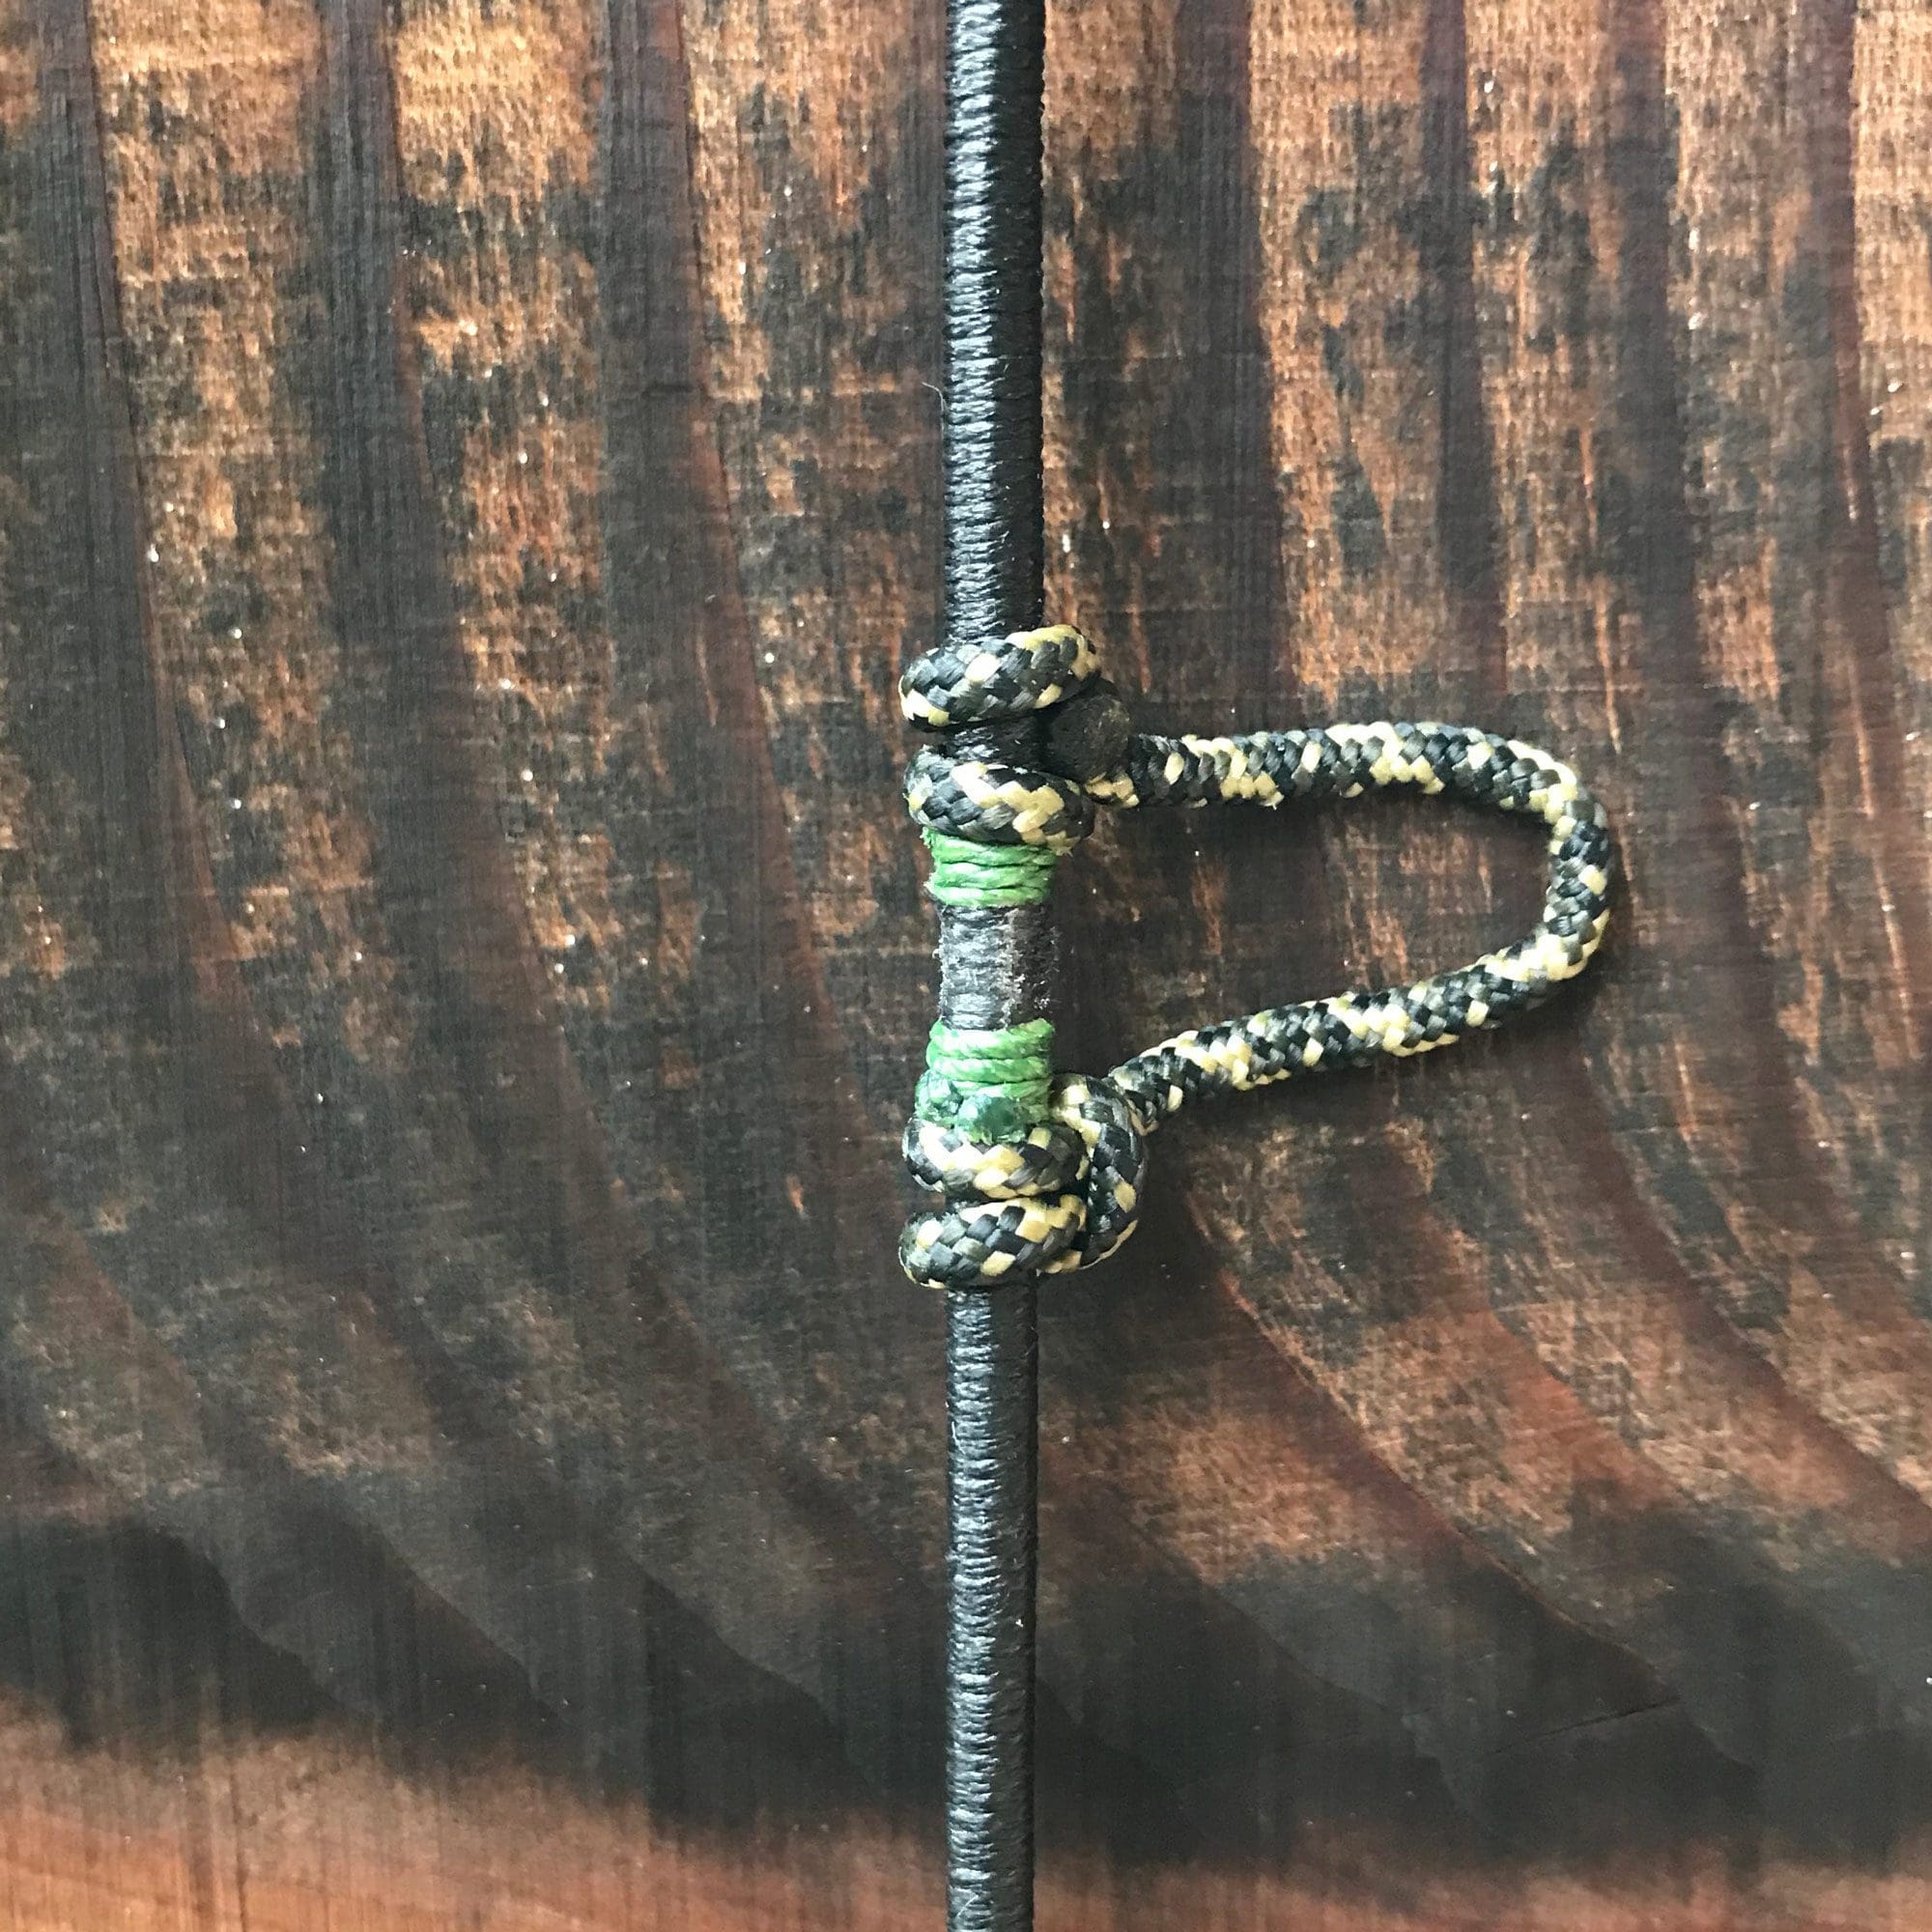
7. Tie knots Inside Your D-Loop
D-loops can pinch your nock and cause inconsistent pressure on the rest if you don’t tie some serving above and below the nock point with a little wiggle room. A bare D-Loop can cause tuning and accuracy issues, but more commonly it shows up when your arrow falls off the rest as you reach full draw. Furthermore, when it’s time to replace your D-loop, the knots above and below will allow you to tie the new one in the exact same place with no effect on your point of aim and tune.
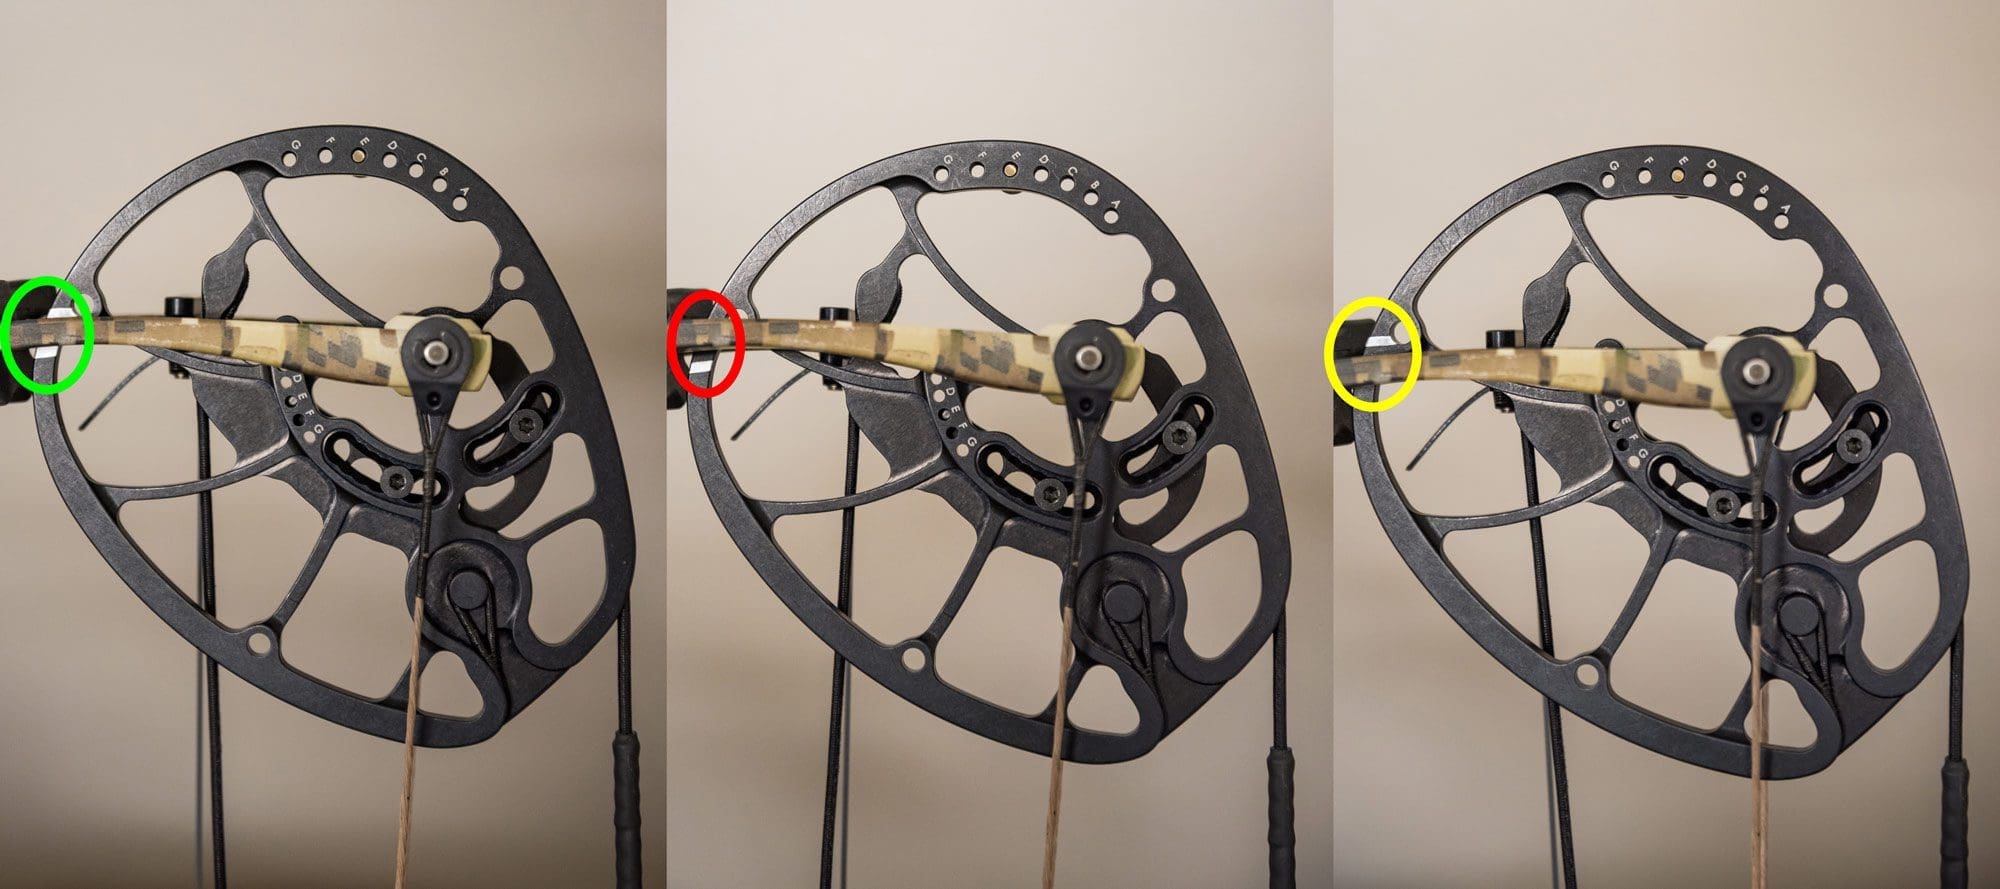
Mark Your Cams and Tiller Bolts: The green circle illustrates what you should see when all is well. The red indicates the string has stretched, and the yellow indicates that a cable has stretched
8. Mark Your Cams and Tiller Bolts
Once you get your compound bow setup tuned and shooting well, it’s time to make some reference marks on the cams so you’ll be able to monitor string and cable lengths over time. Otherwise, subtle changes can go unnoticed and gradually degrade accuracy.
I like to use a silver Sharpie marker to trace a line onto the cams on both sides of the limb, using the limb as a straight edge. If the string or buss cable stretches, the marks will move relative to the limb, allowing you to visually identify the problem. By adding a twist to the offending string, you can easily return the bow to the exact position where it shoots and tunes best. This is the easiest way to monitor cam synchronization and draw length.
9. Obey the Speed Limit
Broadhead-tipped arrows usually group their best below 290 fps. I usually try to keep my bows in the 275-–285 fps range. That speed provides a good balance between a reasonably flat trajectory and excellent broadhead accuracy.
With the faster bows available today, it’s easy to break this speed limit using light arrows. You may get away with it if your bow is tuned extremely well, your form is excellent, and you use a small fixed or low-profile expandable broadhead. However, it doesn’t take much to cause groups to open up wildly if something changes.
I shoot heavy arrows to keep me in the more forgiving range. This year my hunting arrows weighed about 504 grains and were flying at 284 fps.
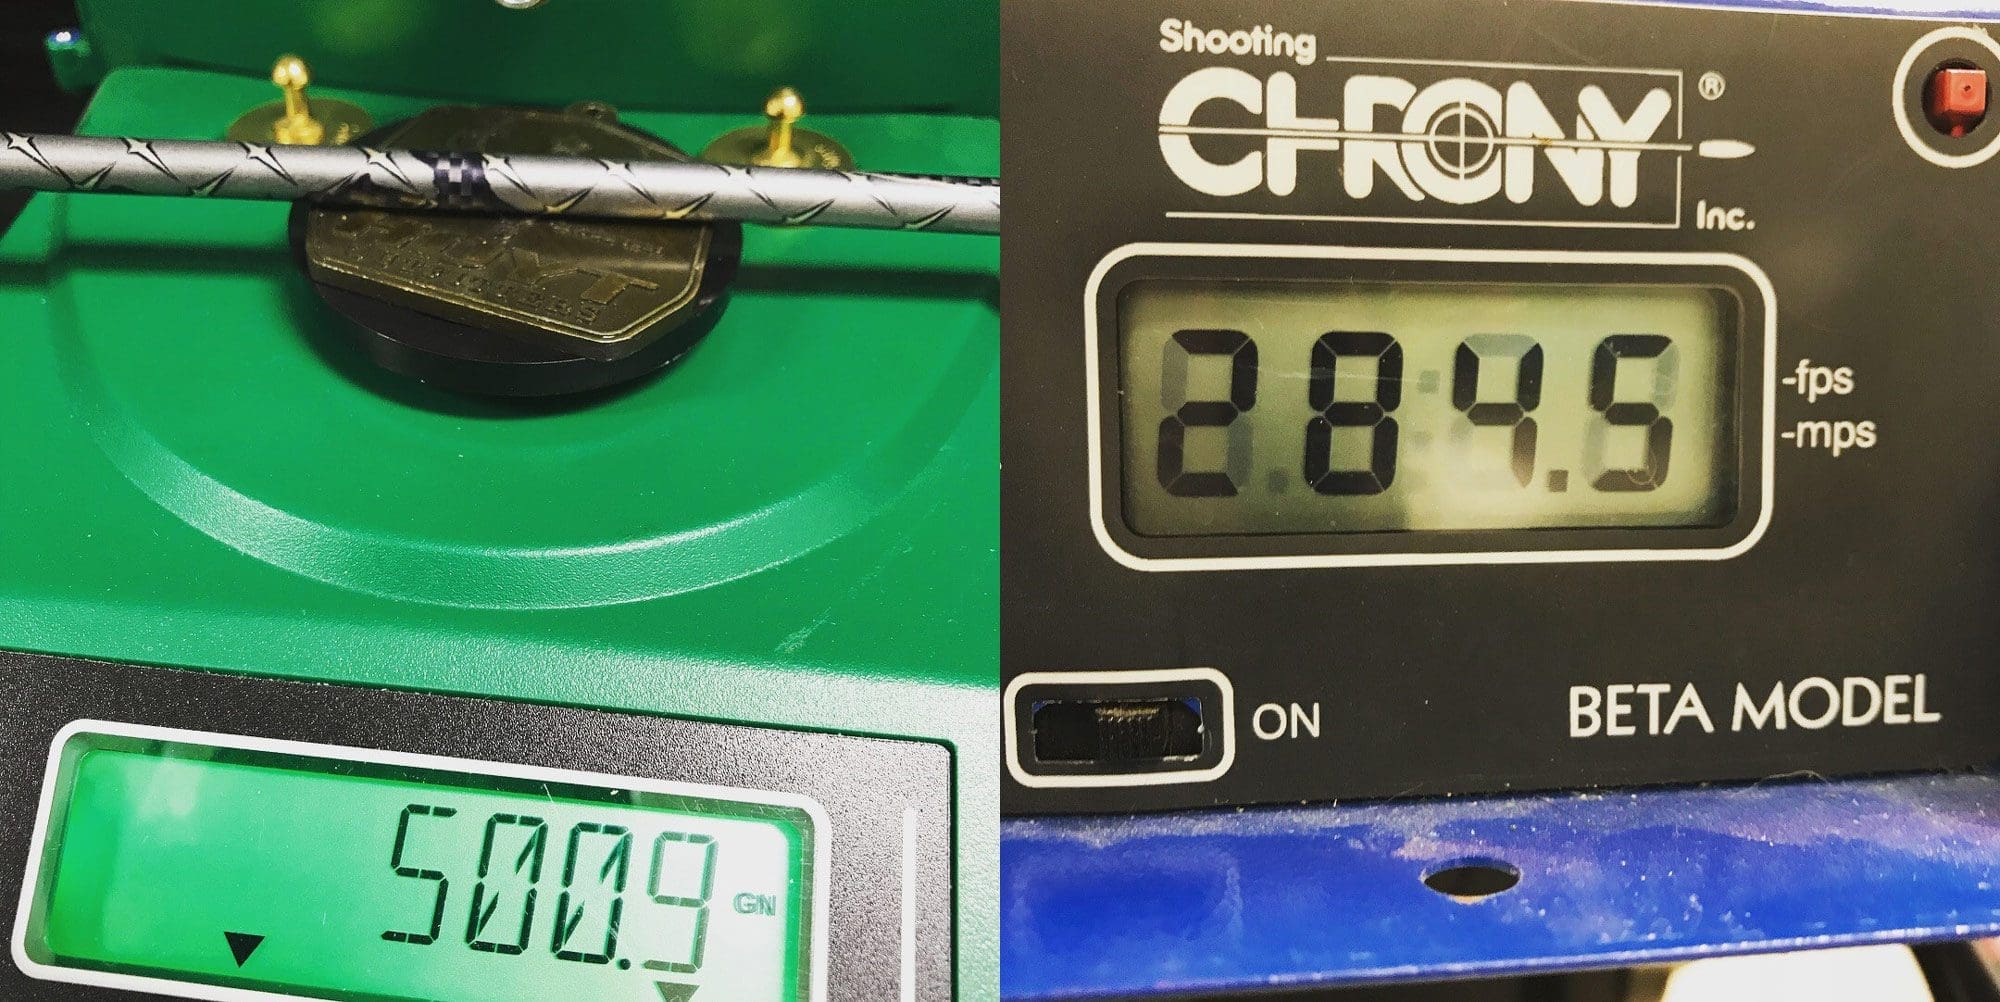
I do my best to ensure my form and equipment is on point, but I play it safe and shoot heavier arrows that keep my velocity under 290 fps. This helps me maintain accuracy, maximize penetration, and keep my bow quieter. This year my hunting arrows weighed about 504 grains and were zipping along at 284 fps.
10. Go Heavy
This ties in directly with the speed limit, but there are other advantages to shooting a heavy arrow. Heavy arrows will penetrate better than lighter arrows. Your bow will be quieter and more efficient with a heavy arrow. Heavier arrows deflect less in the wind when all else is equal. Shooting a heavier arrow is easier on the bow and all of your accessories because it reduces vibration. When looking for additional arrow mass, focus on the shaft, and don’t get crazy with point weight (see next topic).
11. Forget About FOC
Arrow forward of center balance (FOC) is a pretty common topic these days. It’s usually expressed as a percentage of how far the balance point is forward of the shaft centerline. Several factors such as point weight, broadhead length, vanes, shaft length, and arrow wraps influence FOC.
There are some interesting (silly) recommendations for FOC floating around the internet. I’ve tested a lot of different setups over the years and my best-shooting compound bow setup always have about 150 grains of total point weight (insert + broadhead). If I go much over this, my bows are harder to tune, and I usually experience strange broadhead flight. When I shoot arrows with 120 grains or so of total point weight, they shoot fine, but rarely group as well at long range. I’ve repeated the results enough with various bows, arrows, and broadheads that I no longer question it. I find a broadhead and insert combination that nets about 150 grains total and I’m done. I don’t measure or care what the FOC is – I spend my time shooting broadheads…in the middle!
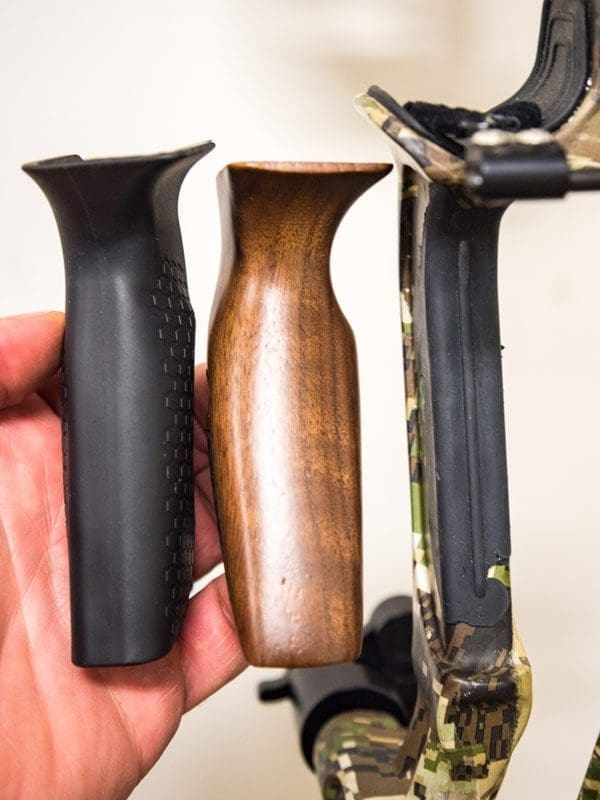
12. Toss the Grip
The grip is the one place that you physically touch the bow during a shot. It’s also the source of the #1 accuracy killer: torque.
Manufacturers produce grips of wood, plastic, and rubber that make holding and carrying your compound bow setup a little more comfortable. However, these grips usually induce extra torque into the shot, because they add width to the riser. The curved surfaces of most factory grips also make it more difficult to locate your hand consistently.
That’s why you never see top professional archers shooting compound bows with wood and plastic grips installed. I find that my hunting bows tune and shoot more consistently when I remove the factory grip and shoot with my hand directly on the riser.
It may feel a little uncomfortable at first, but soon you’ll find yourself shooting more consistently. Some risers are more comfortable than others. I like to wrap the handle with tennis racquet tape or even add a shim to correct the angle on some bows with flat grips. I find that tennis racquet tape provides enough friction that I can relax my bow hand completely because a relaxed hand is more consistent. You may need to shorten draw length a bit shorter to make up for the thickness difference between the grip and riser (usually about 3/16”).
Don’t Overlook the Basics
A proper compound bow setup can go a long way toward helping you shoot more accurately and execute better shots in hunting situations. Don’t overlook the basics, and be sure to make and monitor your cam reference marks to keep your bow shooting its best throughout the season.
A shot opportunity is a terrible thing to waste. Make the most of it and shoot straight!